Agent modes (Modes)

Several agent modes are available.
General mode
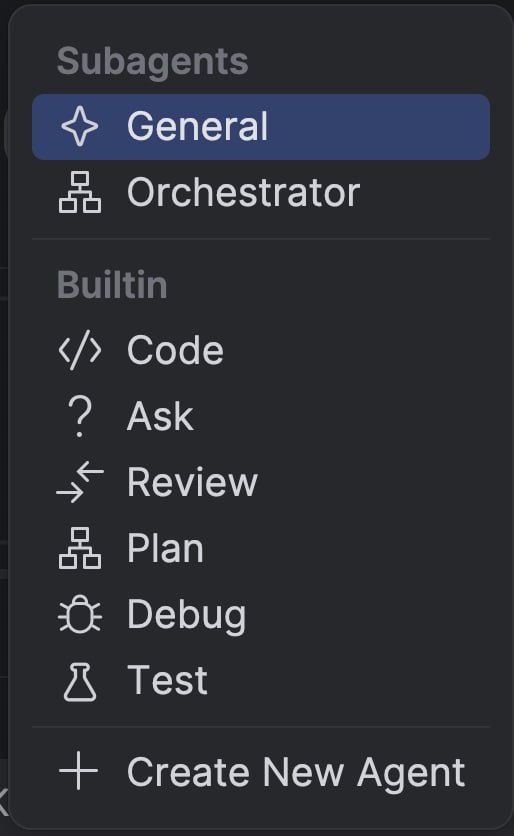
General is useful when you do not want to choose a mode upfront. It handles simple tasks itself, and for bigger work it calls subagents: one can explore the project, another can change the code, a third can prepare tests or check the result.
Use General when the task may grow as you work. For example, you may need to find several places in the project, fix the code, write tests, and verify the changes without switching modes by hand.
Orchestrator mode
Orchestrator is for large tasks that are better split between specialized subagents. It does not edit files or run tools directly. Instead, it hands subtasks to the right agents: Code, Ask, Test, Review, Plan, or Debug.
Use Orchestrator when you already know the task needs several roles. For example, you may need to explore the project, plan the changes, write code, prepare tests, and check the result separately.
Orchestrator is also useful:
- With models that struggle to break large tasks into parts on their own. Orchestrator takes over the decomposition and the control of subtasks.
- In Skills with a long sequence of steps.
Set Orchestrator as the skill's main agent: it will keep the steps in order and hand each one to a suitable subagent regardless of the selected model.
To do that, specify
agent: Orchestratorin the skill's YAML front matter and addOrchestratorto theused-bylist. For more about these fields and a configuration example, see Explyt extensions:agentandused-by.
Code mode
A full-fledged agent that can read and edit files. Best suited for day-to-day work that is not about exploring the project or testing.
Choose Code when the task is already clear and you need to make a local change: for example, add a check to an existing method, fix error handling, or update a configuration. If you first need to understand an unfamiliar part of the project, start with Ask; to generate tests, use Test.
Ask mode
A read-only agent mode: it can read files in the project and pages on the internet. Best suited for exploring a project (for example, onboarding into a new codebase), brainstorming implementation ideas, and analyzing the causes of a bug.
Test mode
A mode focused on test generation.
Although you can generate tests in Code mode as well, this mode gives better results.
Choose Test when you need to create tests for existing code or significantly extend an existing suite. Name the class or method, the expected behavior, and the project constraints, then ask the agent to generate the tests and run the narrowest test configuration. The detailed workflow and result verification are described in the Add tests guide.
For example, on our internal benchmark of 33 real projects (with endpoints of ~2000 lines, ≥150 KLOC with Spring, TestContainers, Java, Kotlin) with all other things being equal (the same model and the same input prompt), the Test agent gave significantly better results than the basic Code agent.
| Test generation task from source code | Code | Test |
|---|---|---|
| Percentage of compiled test classes | 76% | 94% |
| Percentage of passing tests | 67% | 90% |
| Test coverage | 64% | 80% |
The Test mode is available in IDEA for Java and Kotlin, and in Rider, WebStorm, and PyCharm for C#, JavaScript, TypeScript, and Python projects.
Plan mode
The mode shows a detailed plan of steps for the request and lets you edit it while working. It is useful when you need to agree on the sequence of actions before a complex task, for example migrating to a new framework version or creating a microservice from scratch. The plan is split into subtasks with acceptance criteria and saved in the repository as a set of files, so other team members can discuss it.
Review mode
The mode focuses on checking changes made by the agent or by another person. The main file-editing tools are unavailable in it.
For code, the Review agent can run anti-pattern checks, such as verifying that the code does not use try/catch on a base exception type (for example, Throwable).
For that, the mode uses IDE inspections to highlight potential issues in the code and reduce the risk of accumulating tech debt.
Choose Review after implementation and before a commit or merge, when you need an independent check of the diff. Give the agent the changes, state what is critical for your project, and ask it to check correctness, security, and possible regressions. The general review sequence is described in the Review the agent's changes guide.
The available tool set depends on your configuration and on experimental IDE capabilities. Review does not give a strict technical guarantee of a read-only mode: the set may include tools that change state. Check the available tools and permissions before you start; for a strict read-only scenario, create a custom mode with an explicit list of read-only tools.
Debug mode
Debug mode lets the agent control the IDE debugger: set breakpoints, run a scenario under the debugger, and analyze variable values and the call stack.
For a reproducible error, follow the step-by-step Debugging with Debug mode instructions.
Custom agent modes
You can create your own agent modes through the button in the agent selection menu. This lets you set up an agent for a specific task, such as a technical writer for documentation. In such an agent, you can explicitly define the available tools and the list of preinstalled Skills to focus it on a specific scenario (for example, security or documentation).
We support a subset of the Claude agents format, so you can take any Claude agent and use it without changes. Support for the format will be expanded in upcoming releases.
For more about what each agent mode can and cannot do, see the feature matrix.