Every developer has their own set of tools for different tasks: one person on the team works in Cursor, another is trying Codex, a third is working through a task in the terminal with Claude Code. Each of these tools needs its own model subscription, and with it a separate account, payment, and setup. The more tools, the longer this chain of steps.
In 5.19, an Explyt subscription becomes shared model access for all of these tools. Your personal account now shows an API URL and a subscription key; you paste the key into the settings of Cursor, Claude Code, Claude Desktop, Codex, Cline, OpenCode, or Kilo Code, and the tool runs on OpenAI and Anthropic models paid for with Explyt minutes.
What this gives a developer. One balance for all tools. OpenAI and Anthropic models behind one key, so switching from one to the other in any tool needs no second account. Your existing habits and clients stay in place: only the server address and the key in the settings change.
What this gives a company. Developers keep working in the clients they are used to, while model access for all of those clients goes through one Explyt subscription per person rather than a set of personal accounts with model providers. For Explyt Enterprise, the same mechanism works with a gateway inside the company perimeter: the organization administrator issues the address and the key, and requests from Cursor, Claude Code, or Codex to the models go through the corporate platform, not through employees' personal accounts. For the Enterprise plan, see the pricing page or contact sales.
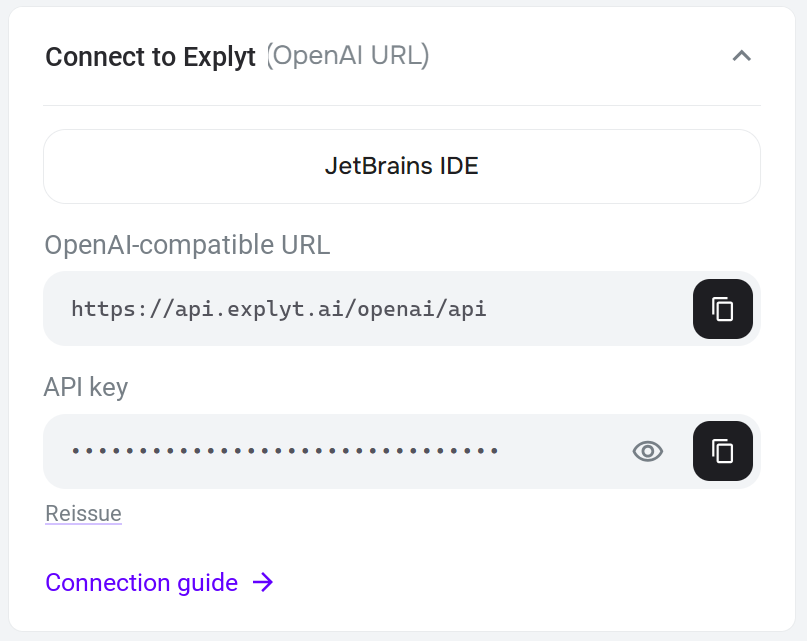
Here is what it looks like. Your personal account has a Connect to Explyt block with two values: the URL https://api.explyt.ai/openai/api and your API key. In the tool's settings, find the fields where you would normally paste your own OpenAI or Anthropic key and a server address, and put these two values there. The tool sends requests to the models through Explyt, and minutes are deducted from the same balance the plugin uses.
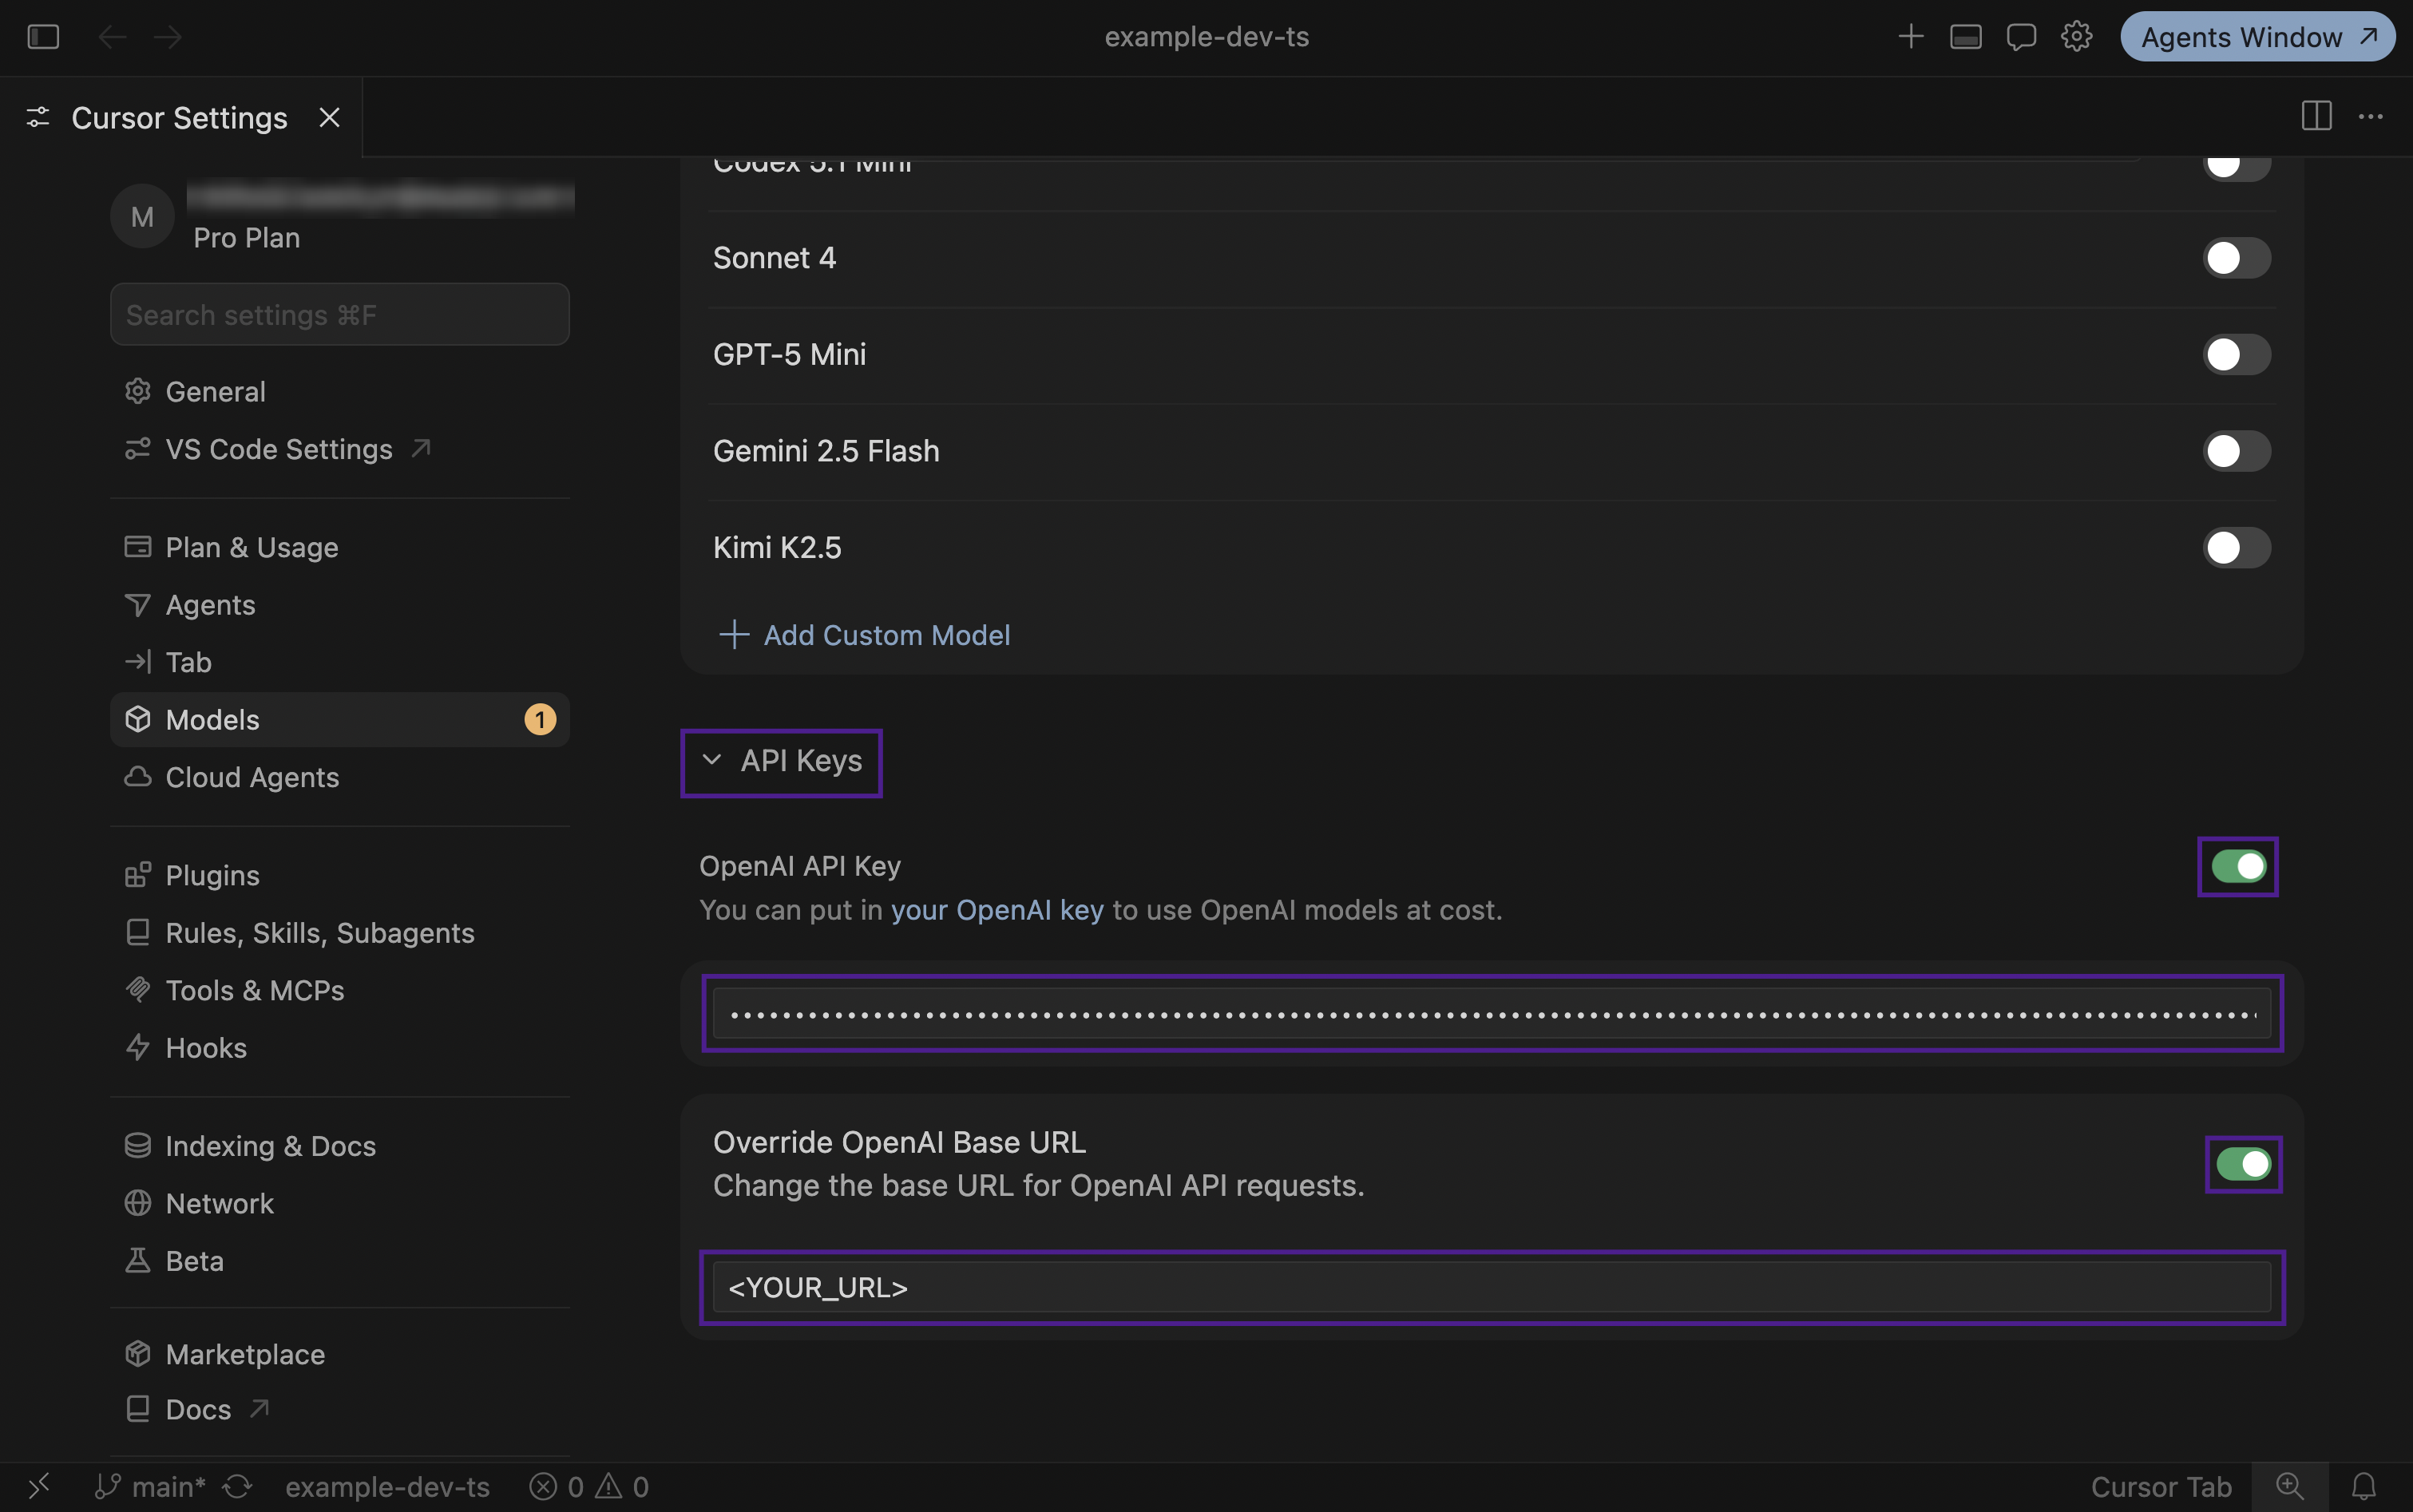
For example, in Cursor this is Settings → Models → API Keys: turn on OpenAI API Key and paste the Explyt key, then turn on Override OpenAI Base URL and paste the URL.
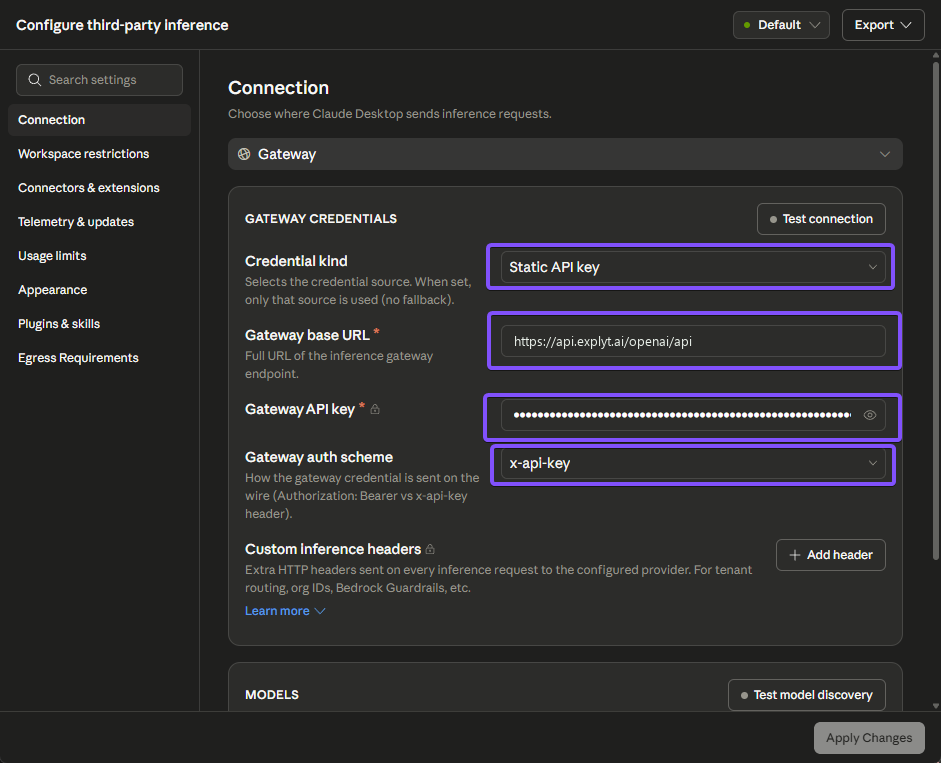
In Claude Desktop this is the Configure third-party inference → Connection → Gateway window: the URL goes into Gateway base URL, the key into Gateway API key, and the auth scheme is x-api-key.
Who gets it. The key is issued when you have an active Explyt subscription or a positive Flex minutes balance: if the Connect to Explyt block is not shown in your account, activate a subscription or top up Flex minutes. This is the key of your Explyt subscription, not an OpenAI or Anthropic key: you do not need separate accounts with the providers.
What this does not give. Only requests to the models go through the key. IDE tools, skills, and Explyt agent modes stay in the plugin for JetBrains IDEs; the free MCP server from version 5.17 is what exposes them to an external agent. See "What is not passed through the key" below.
Beyond that, the plugin fixes the context fill indicator, which understated its readings by roughly a third, and connections to MCP servers with browser sign-in, which used to drop after an hour. Details below.
How to connect a tool
Step-by-step instructions with screenshots for every tool, plus a breakdown of common errors, are collected in the Connecting external tools to Explyt section of the documentation. The general scheme is the same for all of them:
- Open your personal account and find the Connect to Explyt block. Click Copy key; the eye icon shows the value.
- In the tool's settings, find where the provider key and server address are set. Paste the URL
https://api.explyt.ai/openai/apiand the Explyt key. - Do not sign in to the tool's own account through ChatGPT or Anthropic: such a sign-in routes requests past the Explyt gateway, and they will be rejected.
- Pick a model. Many tools load the model list from the gateway themselves; if not, the full list is returned by
https://api.explyt.ai/openai/api/modelswith theAuthorization: Bearer <YOUR_API_KEY>header.
Verified tools:
- CLI agents: Claude Code, Codex CLI, OpenCode;
- desktop apps: Claude Desktop, Codex in ChatGPT;
- editors and extensions: Cursor, Claude Code for VS Code, Kilo Code, Cline;
- the Explyt plugin for JetBrains IDEs in Community mode.
The list grows as we verify more clients. If the client you need is not here but accepts an OpenAI-compatible URL and key, the connection will most likely work, but we have not tested it yet. If something goes wrong, check the error messages page.
There is one key for all tools. If it has leaked or stopped working, click Reissue in your account: the old key stops working immediately, and the new one has to be pasted into every configured tool. Treat the key like a password.
Which models are available
The gateway provides OpenAI and Anthropic models, plus the auto model, which picks a suitable model itself and gives the highest availability. There is one exception: the Codex app in ChatGPT works only with OpenAI models and auto. Anthropic models in combination with Codex are available through Codex CLI.
What is not passed through the key
The key gives access to models and nothing else. In an external tool you will not get:
- IDE tools: project navigation, run configurations, the debugger, IDE-powered refactoring;
- skills, modes, rules, and checks of the Explyt agent;
- subscription data in the third-party tool's interface: the remaining minutes and the current chat's spend are shown in your personal account.
If an external agent needs IDE tools, use the Explyt plugin's MCP server: it exposes selected tool groups without its own inference and does not require a subscription. The key and the MCP server solve different problems and can work together: the model through the Explyt gateway, the tools through MCP.
Explyt plugin: Personal or key
The plugin for JetBrains IDEs can work with a subscription in two ways:
- Personal: sign in to your Explyt account right from the plugin, no key needed. This is the main way.
- Community: connect to the gateway with the OpenAI-compatible URL and API key, the same way third-party tools connect.
Minutes are spent the same way. The difference is in the integration: in Personal, the plugin knows about your subscription and shows the remaining minutes, the current chat's spend, and an up-to-date model list with parameters. In Community, the plugin sees the gateway as an OpenAI-compatible provider and does not get this data. Unless you have a specific reason, there is no need to use a key in the plugin.
The context indicator shows the real fill level
The context fill bar in the chat understated the size of the history by roughly a third. A chat that had already hit the model's limit looked as if it still had plenty of room: history auto-compression did not start, and the request ended with a provider error. The understated reading also distorted the estimate of minutes spent in the chat.
The cause is the makeup of an agent chat's history. It consists mostly of code and tool results, and such text splits into tokens more densely than prose. A local estimate calibrated for prose produced a systematic error.
In 5.19, Explyt checks its estimate against the number of input tokens the provider reports after each response and corrects the indicator. The correction is saved with the chat, so after an IDE restart a long conversation will not look half-empty again. No separate setting is needed.
Automatic renewal of MCP server access tokens
Some MCP servers issue an access token after a browser sign-in. Such a token usually lives about an hour, while an IDE session lasts noticeably longer. The first tool call after expiry ended with an error and sent you to the settings to reconnect.
Now Explyt renews the token ahead of time, while the old one is still valid. If several such servers are connected, each gets its own token rather than someone else's.
After updating to 5.19, you will need to go through the browser sign-in once more for each such server. Servers with a manual authorization header and local servers are not affected by the change.
Performance and fixes
Explyt hits the file system less often when checking paths that the agent mentioned but that do not exist in the project.
Forks and subagents now receive the already compressed chat history. Previously, after compression a fork paid again for all the tokens that had been saved. Cases where a chat stopped sending messages after compression are also fixed, and saved chats that were corrupted by this bug earlier have been restored.
After updating from a previous version
Existing chats and settings keep working. For the new features:
- open your personal account and make sure the Connect to Explyt block is shown; if it is not, activate a subscription or top up Flex minutes;
- when connecting an external tool, paste the Explyt key instead of signing in to that tool's account;
- for MCP servers with browser sign-in, go through authorization once more;
- to estimate spend in a long chat, rely on the indicator after the model's first response: before that point, the local estimate is shown.
Update Explyt
Open Settings | Plugins | Installed, find Explyt, and click Update if an update is available. Restart the IDE after installation if prompted.
If Explyt is not installed yet, download the plugin from the Explyt download page and follow the installation instructions. Connecting external tools does not require the plugin to be installed: a subscription and the key from your personal account are enough.
The full list of supported tools, their types, and their specifics is in the Connecting external tools to Explyt documentation section.
Get started with Explyt
Reproduce, inspect and fix inside JetBrains IDEs, with the debugger, run configurations and IDE facts as evidence.