Sub-agent Profiles (Model Routing)
0. Before you start
What are sub-agent profiles?
When the agent works on a big task, it can hand part of the work to sub-agents — specialized agents (Code, Ask, Test, Review, Plan, Debug). By default, a sub-agent runs on the same model as the main (parent) agent.
Sub-agent profiles (the Model Routing feature) let you pre-define named
profiles — fast, balanced, strong, for example — and pin each to a specific
model and reasoning level. The main agent then picks the right profile for each
sub-task by its text description.
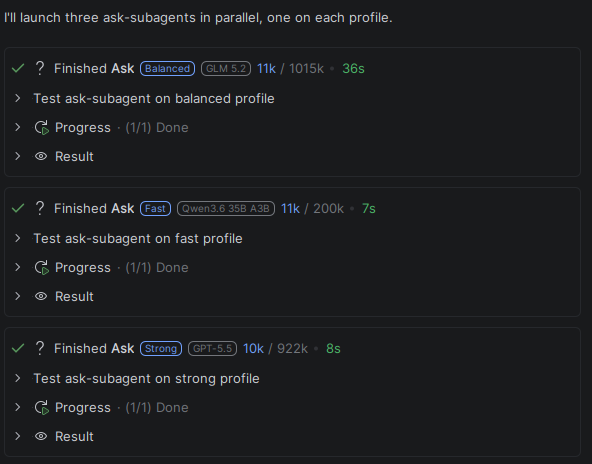
A profile consists of:
- an alias — a short name the main agent uses to refer to it;
- a description — in plain language, when to use this profile;
- (optional) a specific provider model;
- (optional) a reasoning level for that model.
No model set? The profile inherits the parent agent's model.
Why bother?
Different sub-tasks call for different models.
- A cheap, fast model — for code search, reading files, short answers.
- A balanced model — for routine analysis and test generation.
- The most powerful (and expensive) model — for tricky architecture, non-trivial edits, deep review, hard debugging.
Profiles let you:
- save money — lightweight work goes to cheap models;
- raise quality on complex work — it goes to the powerful model;
- keep things predictable — model selection follows explicit rules, not luck.
Built-in profiles
Three default profiles ship with the system (fast, balanced, strong). You can't delete them, but you can edit them (assign a model, change the description).
| Profile | Default purpose |
|---|---|
fast | Lightweight read-only search, file reading, summarization, simple codebase exploration. |
balanced | Ordinary analysis, medium-complexity Q&A, routine test generation, typical implementation support. |
strong | Complex architecture analysis, non-trivial code edits, hard debugging, and deep review. |
By default, built-in profiles have no model assigned — they inherit the parent agent's model (Inherit parent). To start routing requests to different models, assign concrete models to them.
You can also create custom profiles with any alias you like
(for example, second-reviewer, planner).
1. Configuring profiles in Settings
Profiles live in Settings → Tools → Explyt → Model Routing.
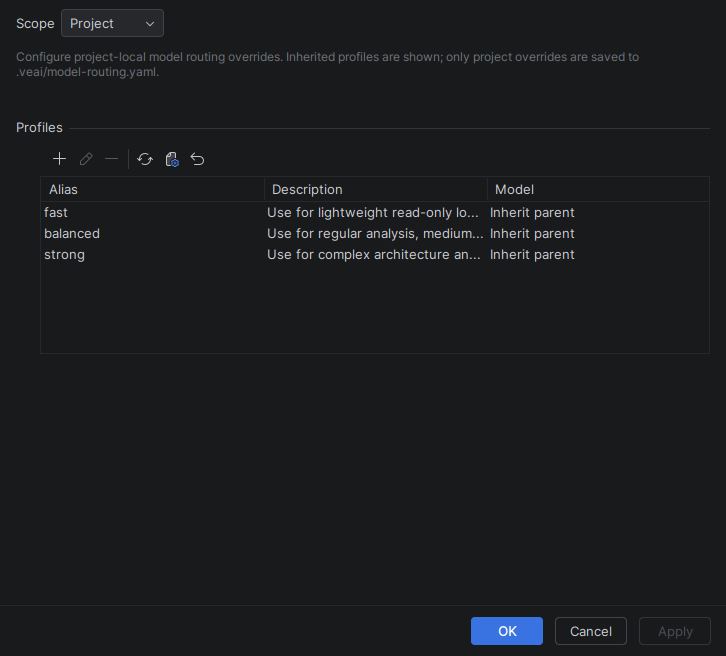
Scope
At the top, pick the scope:
- Project — profiles for this project only.
- Global — profiles shared across all projects on your machine.
Profile table
The Profiles section has three columns:
- Alias — the profile alias;
- Description — when to use it;
- Model — assigned model and reasoning level, or
Inherit parent.
Add / edit dialog
Add profile to add, Edit profile (or double-click a row) to edit, Remove profile to delete.
Fields: Alias, Description, Mode, Model, Reasoning.
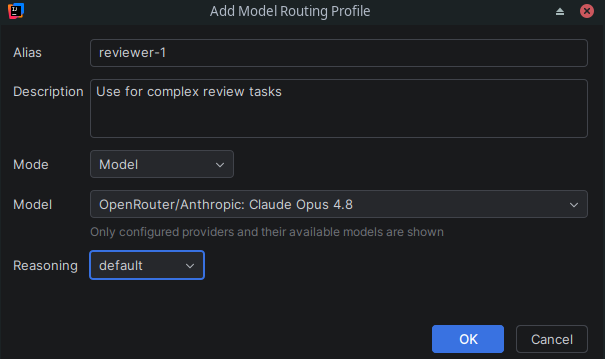
2. Profile fields
Alias
A short name the main agent uses to reference the profile.
- Must match
[a-z][a-z0-9-]*— lowercase Latin letters, digits, and hyphens, starting with a letter (e.g.,fast,gpt-5,reviewer). - Must be unique within the scope.
- Built-in aliases can't be changed.
Description
Plain-language instruction telling the main agent when to pick this profile. This field drives the routing.
- Can't be empty.
- Write a short usage scenario, for example: "Use for lightweight read-only lookup and file reading."
Tip: to temporarily stop the agent from using a built-in profile that can't be deleted, give it a description like "never use it."
Mode: Inherit parent and Model
Mode decides how the profile picks a model:
- Inherit parent — no model assigned; the sub-agent uses the parent agent's model. Model and Reasoning fields are inactive.
- Model — locks to a specific provider model. Model and Reasoning fields become active.
3. The model-routing.yaml file
Profiles are stored in model-routing.yaml:
- project-level —
.explyt/model-routing.yamlin the project root; - global —
~/.explyt/model-routing.yaml.
Project-level overrides global: same alias in both? Project wins.
File structure:
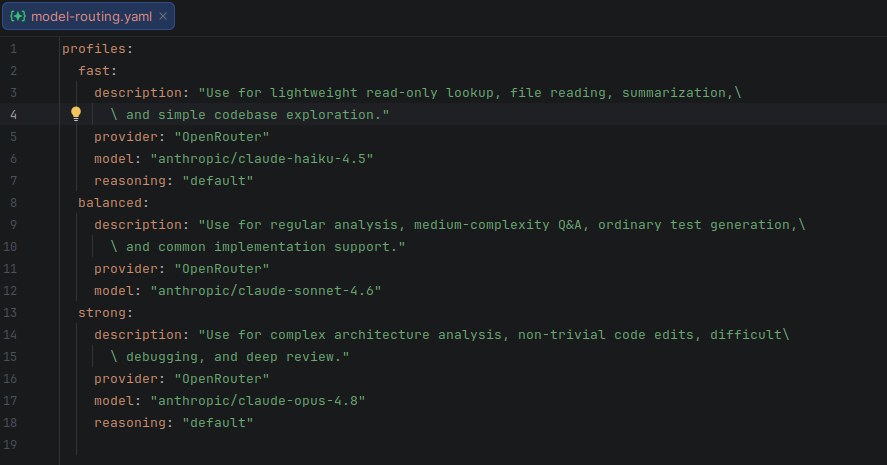
Tip: you can edit
model-routing.yamldirectly in the IDE, but it's safer to use the settings UI.
5. Recommendations
- Start by pinning models to
fast/balanced/strong— that alone gets the agent routing sub-tasks to different models. - Write descriptions as clear selection rules. The agent relies on them. The more specific ("read-only", "test generation", "deep review"), the better the routing.
- Use the Project scope and commit
model-routing.yamlso the whole team shares the same rules. - Lock expensive models to
strongand rare profiles; route bulk work tofast/balancedto keep token use in check. - If a built-in profile is temporarily not needed and you can't delete it — switch to Inherit parent or make its description discourage use.
Use cases
Cross-model consensus: one task — three models in parallel
On a hard task, it helps to run the same job with several agents on different models, then compare the results: the models compensate for each other's weak spots. You get a "consensus" where several models independently solve the task and arrive at a shared conclusion.
Setup:
- Create three profiles, for example
gpt,opus, andglm, and pin a different provider model to each. The names are arbitrary — pick whatever you like. - Make the descriptions general enough that the main agent can route the same sub-task to each profile.
Working mode. Run the main agent in Orchestrator mode: it doesn't edit files itself but delegates sub-tasks to sub-agents, which suits coordinating three models. General also works if the task might grow and you want the main agent to do part of the work itself. Run sub-agents in Code mode (when edits are needed) or Ask mode (research and brainstorming, read-only).
Then give the main agent an instruction roughly like this:
Solve this task in parallel with three sub-agents — the gpt, opus, and glm profiles.
Each should independently propose a solution. Then compare their answers,
find discrepancies, and formulate a final solution that accounts for all viewpoints.
Sharing between sub-agents. Sub-agents run in parallel and can't see each other's progress, so it's convenient to keep shared context in a file under the .tasks/ directory: each agent appends its variant and comments on the others, and the main agent assembles the final result.
Tip: treat the shared file in
.tasks/as a "discussion board" where each agent notes what it agrees with and what it disputes. Instead of three independent answers, you get one discussion with a shared conclusion.
Ready-made skill. Save the prompt as .explyt/skills/multi-model-consilium/SKILL.md — then you can launch it with the /multi-model-consilium command or automatically when the agent deems it necessary. Adjust the profiles to your needs.
---
name: "multi-model-consilium"
schemaVersion: "v0.1"
description: "Solve a task in parallel with three models and compare results (cross-model consensus)"
agent: "General"
used-by:
  - "Orchestrator"
  - "General"
---

1. Run the task in parallel with three sub-agents in Code mode using the `gpt`, `opus`, and `glm` profiles (see Model Routing). For research without edits, use Ask mode.
2. Each sub-agent independently proposes a solution and writes it to its own section of the shared file `.tasks/consilium/<task>.md`.
3. When all three finish, read the file, compare the answers, and find discrepancies.
4. Formulate a final solution that accounts for all viewpoints and record it in the same file.
Cross-model review
The same technique works for review: several models check the same change, and the main agent compares the findings and resolves discrepancies. This is useful when you want to reduce the risk of missing a bug due to a blind spot in one model.
The setup is the same — several profiles with different models.
Working mode. The main agent, Orchestrator, coordinates the sub-agents. Run reviewers in Review mode: it only reads files and is therefore safe for checking changes — each model sees the edit but changes nothing.
Request to the main agent:
Review these changes in parallel with the gpt, opus, and glm profiles.
Each should independently find problems. Then merge the findings,
remove duplicates, and produce a single prioritized list.
Tip: put each review result into a shared file under
.tasks/, and let the main agent handle deduplication and prioritization. The output is one consolidated report instead of three independent ones.
Ready-made skill. Save the prompt as .explyt/skills/multi-model-review/SKILL.md — then you can launch it with the /multi-model-review command or automatically when the agent deems it necessary. Adjust the profiles to your needs.
---
name: "multi-model-review"
schemaVersion: "v0.1"
description: "Review changes in parallel with three models and produce a single list of problems"
agent: "Orchestrator"
used-by:
  - "Orchestrator"
  - "General"
---

1. Run a review of the changes in parallel with three sub-agents in Review mode using the `gpt`, `opus`, and `glm` profiles.
2. Each sub-agent writes the problems it finds to its own section of the shared file `.tasks/review/<review>.md`.
3. When all three finish, merge the findings: remove duplicates and assign priorities.
4. Produce a single consolidated list of problems.