On September 28 we ran the webinar "Working with AI Tools at the User Level". Sergey Pospelov from the Explyt team walked through why an agent confidently solves the wrong task, how to make it check its own work, and what to set up in the IDE in 30 minutes. Below are the notes, based on the recording and the extended guide.
The webinar ran a little over an hour: 50 minutes of theory on slides and 20 minutes of live demo in IntelliJ IDEA. The recording will be published on the Explyt YouTube channel: https://www.youtube.com/@Explyt-ai. The extended guide with every diagram, the spec example and the setup checklist is at explyt.ai/en/webinar-ai-tools-extended.html.
The central idea of the webinar: which agent you pick matters less than the context you give it, the methodology you follow, and the way you verify the result. The examples in the webinar are Java and Spring Boot in IntelliJ IDEA.
Try the methodology on your own project today. It is not tied to Explyt: the rules about context, specification, tests and review work with any agent, whether that is Claude Code, Codex or Cursor. Take one task from the backlog, follow the instruction below step by step, from the three anti-patterns to the 30-minute checklist, and compare the result with what the agent used to give you. This is an instruction for a clean start: every section ends with an action you can take in the IDE right now.
TL;DR
Hours of agent work are lost for three reasons: 1) insufficient context (the agent fills in the gaps and solves the wrong task), 2) overloaded context (after three hours in one chat the agent mixes tasks up), and 3) blind trust in the output (the code looks right, the agent sounds confident, a week later there is a bug in production). Each one has a symptom you can spot and a set of concrete fixes: precise wording, one chat per task, automated validation instead of a visual review.
Two approaches close the input and the output: 1) Specification-Driven Development controls the input: the agent in Plan mode writes a spec with context, goal, constraints and acceptance criteria, you edit and approve it; 2) Test-Driven Development controls the output: the agent first writes failing tests from the acceptance criteria, then the code, then runs the tests until green. Together they catch errors before a human sees them. Escalate the approach only when the simpler one stops working.
Validation has to be built into the agent's working cycle: linter, tests, a separate review agent with its own context, at most three rounds of fixes. Subagents and git worktrees help on large independent tasks, and the bottleneck stays the same: the attention of the human doing the review. Realistically you can supervise 2–3 agents at once. Personal setup fits in 30 minutes: global Rules, a couple of personal Skills, Memory Bank in the project.
Three anti-patterns that eat hours and tokens
An empty chat already takes about 12% of the context window (system prompt, tools, AGENTS.md). Between 50% and 85% usage, the quality of the model's answers drops noticeably. At 99% the model cannot respond. All three anti-patterns follow from this.
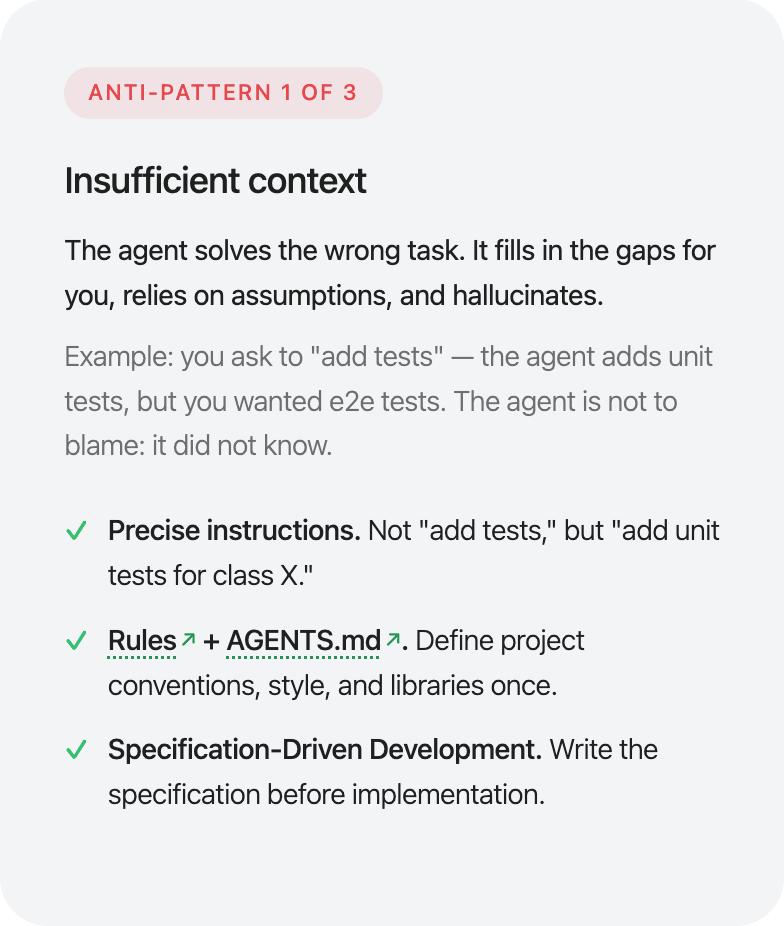
1. Insufficient context. You write "add tests". The agent adds unit tests for one specific class, and you wanted e2e. The agent is not to blame: it did not know. Fixes: precise wording ("add unit tests for class X"), Rules and AGENTS.md with project conventions, a specification before implementation.
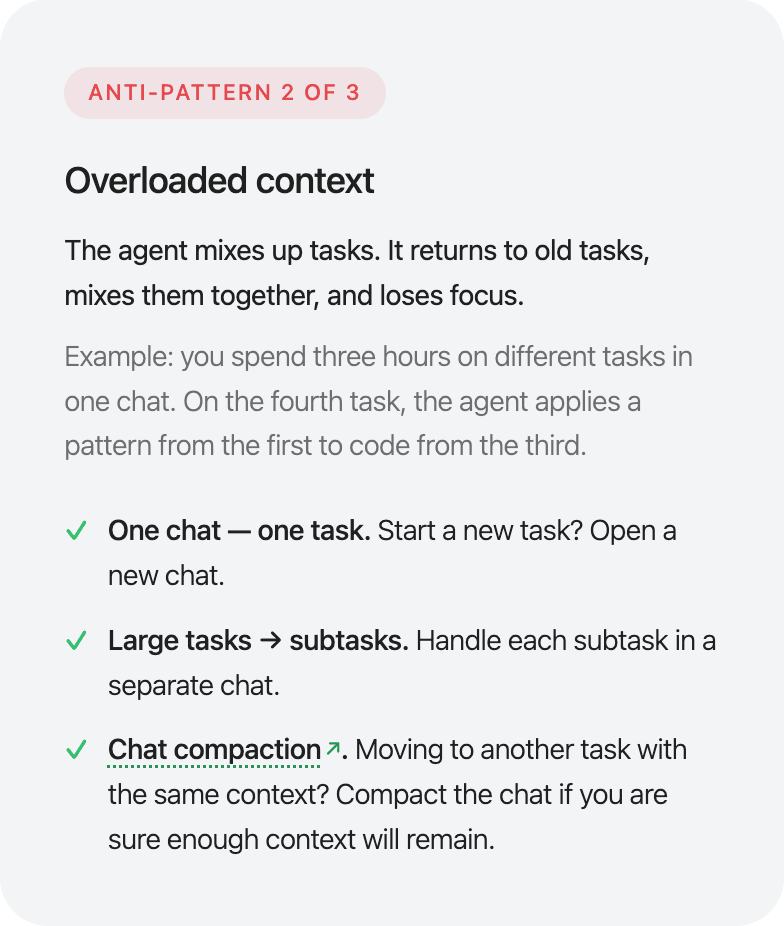
2. Overloaded context. Three hours of different tasks in one chat. On the fourth task the agent applies a pattern from the first to code from the third. Fixes: one chat per task, split large tasks into subtasks in separate chats, chat compaction if you are sure enough of the needed context will survive.
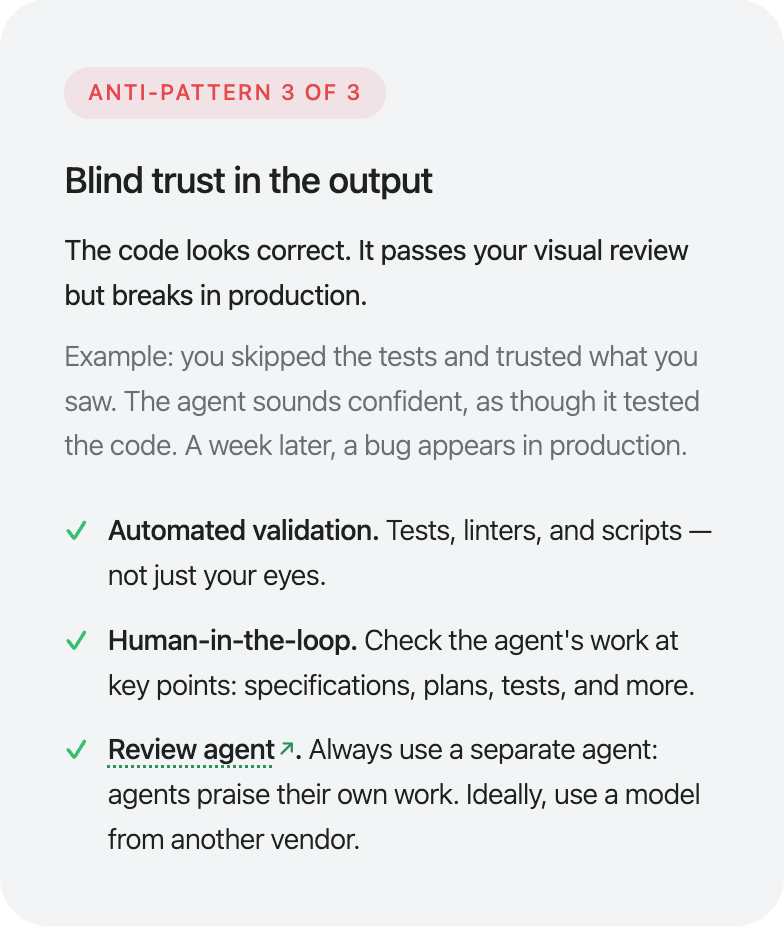
3. Blind trust in the output. The code passed a visual review and broke in production. The agent talked as if it had tested everything. Fixes: automated validation (tests, linters, scripts), human checkpoints at the spec, the plan and the tests, a separate review agent. Agents praise their own work, so the reviewer has to be a separate one, ideally a model from another vendor.
Specification before code: SDD
Solution quality depends on how precisely the agent understands the project and the task. That gives two levels of specification.
1. Project level. AGENTS.md, a reusable project description in the repository, shared with the team. In Explyt a dedicated Skill creates and updates it from the prompt Create AGENTS.md for the current project.
2. Task level. The plan. In Plan mode the agent gathers context on the project, asks clarifying questions and proposes a plan. You check and edit it. Large tasks are split into files: Plan.md, task-01.md and so on.
The objection "writing specs takes too long" has a simple answer: the agent writes, you read and edit. There is a second trick: ask the agent to interview you, ask its questions and build the spec from your answers. A separate spec phase is also needed because the agent collects a lot of context during exploration. The spec compresses it: implementation runs from a short file, and the long exploration history is not needed there.
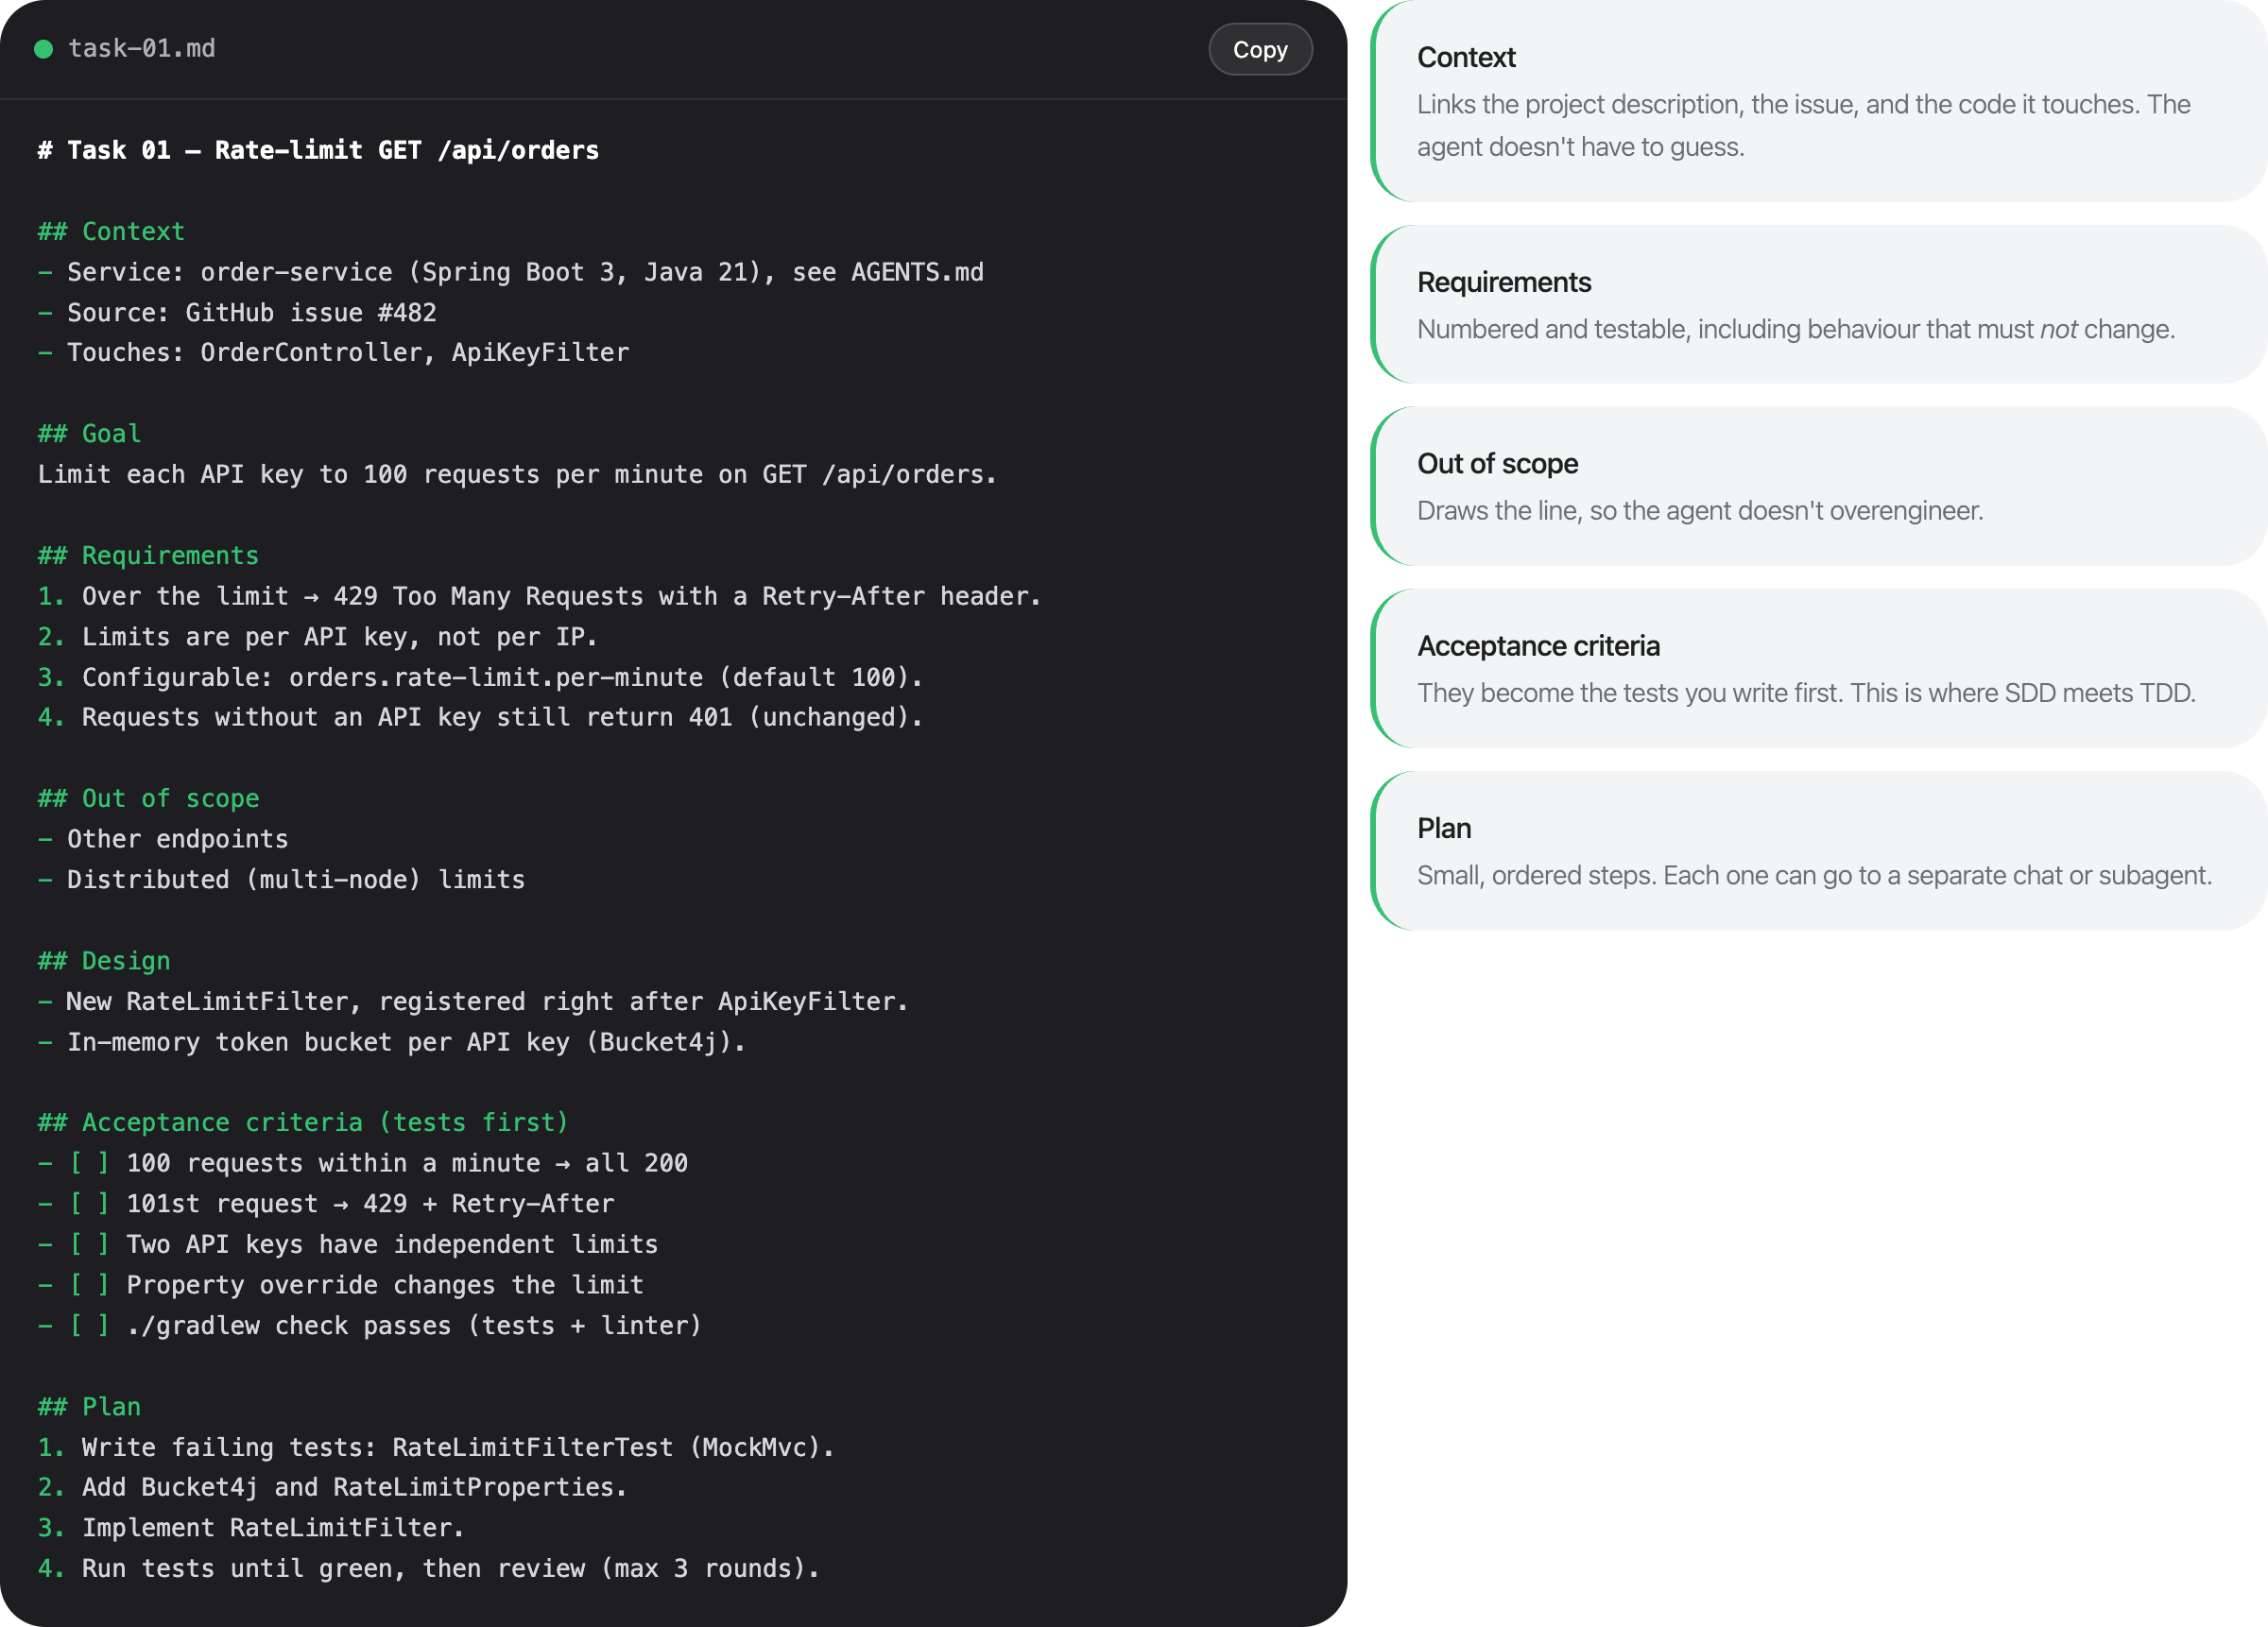
The task-01.md example from the guide: rate-limiting GET /api/orders in a Spring Boot service. Sections: Context (service, link to the GitHub issue, classes touched), Goal, Requirements (numbered and testable, including behavior that must not change), Out of scope, Design, Acceptance criteria as a checklist, Plan. The acceptance criteria are the tests you write first. This is where SDD meets TDD.
Validation before code: TDD
The agent can always make a mistake, so it needs a way to check itself before the result reaches a human. The order: the agent writes tests, the agent writes code, the agent runs the tests. Green? Done. Red? Back to implementation.
The basis for the tests: the task description from a GitHub Issue (connect the GitHub MCP and attach the link) or the spec from Plan mode. In the second case, say explicitly during planning that you want TDD, and check that the agent scheduled test writing before implementation.
SDD + TDD: six steps from issue to merge
SDD controls the input, TDD controls the output. The full cycle looks like this.
- You describe the task: issue link, goal, constraints. Project context is already in AGENTS.md.
- The agent in Plan mode drafts
task-01.mdwith acceptance criteria and a plan. - You approve the spec. Checkpoint. Mistakes here are the cheapest to fix.
- The agent writes failing tests from the acceptance criteria. You approve them and lock them from edits with Edit Scope. Checkpoint.
- The agent implements until green: code, test run, fix, repeat.
- The agent runs the review agent, at most three rounds. Then you read the diff and merge.
The rule: your attention goes to steps 3, 4 and 6. Everything between them is the agent's job.
When to use which approach:
| Task complexity | Approach | What to do |
|---|---|---|
| Simple, prototype | Vibe coding | Create AGENTS.md, pick the agent mode and a Skill, describe the task in the chat |
| Medium or complex | SDD | The agent misunderstands the task: add a specification |
| Medium or complex | TDD | The solution is buggy: add tests before implementation |
| Complex | SDD + TDD | Neither worked alone: combine them |
The practical question when choosing: what is blocking the task, understanding the context and requirements, validating the result, or both.
On autonomy. Three levels: manual control (you approve every step), Plan + Execute + Review (you validate the plan, the review and the code), full autonomy (you validate only the output). One principle: the more autonomy, the better the context has to be and the stricter the validation.
Feedback loops: give the agent a definition of "good"
A feedback loop connects the agent's work to a check, and the result of that check to the next action. The agent runs the checks itself and keeps working until the criterion is met. The prompt from the guide:
Keep writing code until all tests in the e2e folder pass
Any criterion works as long as the agent can check it on its own and report back: the linter passes, the tests pass, no compilation errors or warnings (Explyt checks this automatically), coverage above the threshold (Explyt has an Increase coverage mode), the UI works in simple scenarios via Playwright MCP or Chrome MCP.
There is an anti-pattern here that Sergey called out separately: green tests do not guarantee a correct implementation, because the agent tends to edit tests instead of code. Weaken the assertions, add a mock, mark the test as skipped. A test was failing, the agent disabled it, the criterion is formally met, the bug is still there. Three defenses: lock the test directory from edits with .agentignore (in Explyt that is the Edit Scope setting), separate the roles (one agent or chat writes tests, another implements), send the test diff to a separate review agent, then look at it yourself.
A review loop with a hard stop. Tests catch broken behavior, the review agent catches the rest: missed requirements, risky code, weak tests. The prompt from the guide:
Implement the task from task-01.md. When all tests pass, run a review subagent on your diff. If it reports problems, fix them and run the review again. Do at most 3 review rounds. Stop when the review is clean or after round 3, then report: what you fixed, what is still open, and why.
Why a separate reviewer: agents praise their own work, and a fresh context or a model from another vendor sees what the author missed. Why three rounds: without a cap the agent nitpicks forever, burns tokens and starts rewriting good code. Anything still open after round three needs a human decision.
Subagents and parallel work
Up to this point it was one agent and one task. Next come two ways to split the work: delegate parts of a task to subagents, and run separate agents on parallel tasks. The main question before splitting: will it get easier to finish the task and verify the result. If the answer is no, you do not need more agents.
A subagent is a separate agent with its own context, system prompt and tools. It gives you three things.
1. Specialization. A subagent per task type: review, tests, code search. Each has its own system prompt and its own tool set, so the review agent only reads and judges the diff, and the search agent only searches the code.
2. Clean context. The subagent reads files, runs commands and keeps all the exploration noise to itself. Only the result comes back to the main chat: the places it found, the review verdict, the list of problems. The main context stays short, which is a direct defense against the second anti-pattern, the overloaded chat.
3. Parallel work. Independent subtasks run at the same time: three subagents go through three project modules while you read the plan.
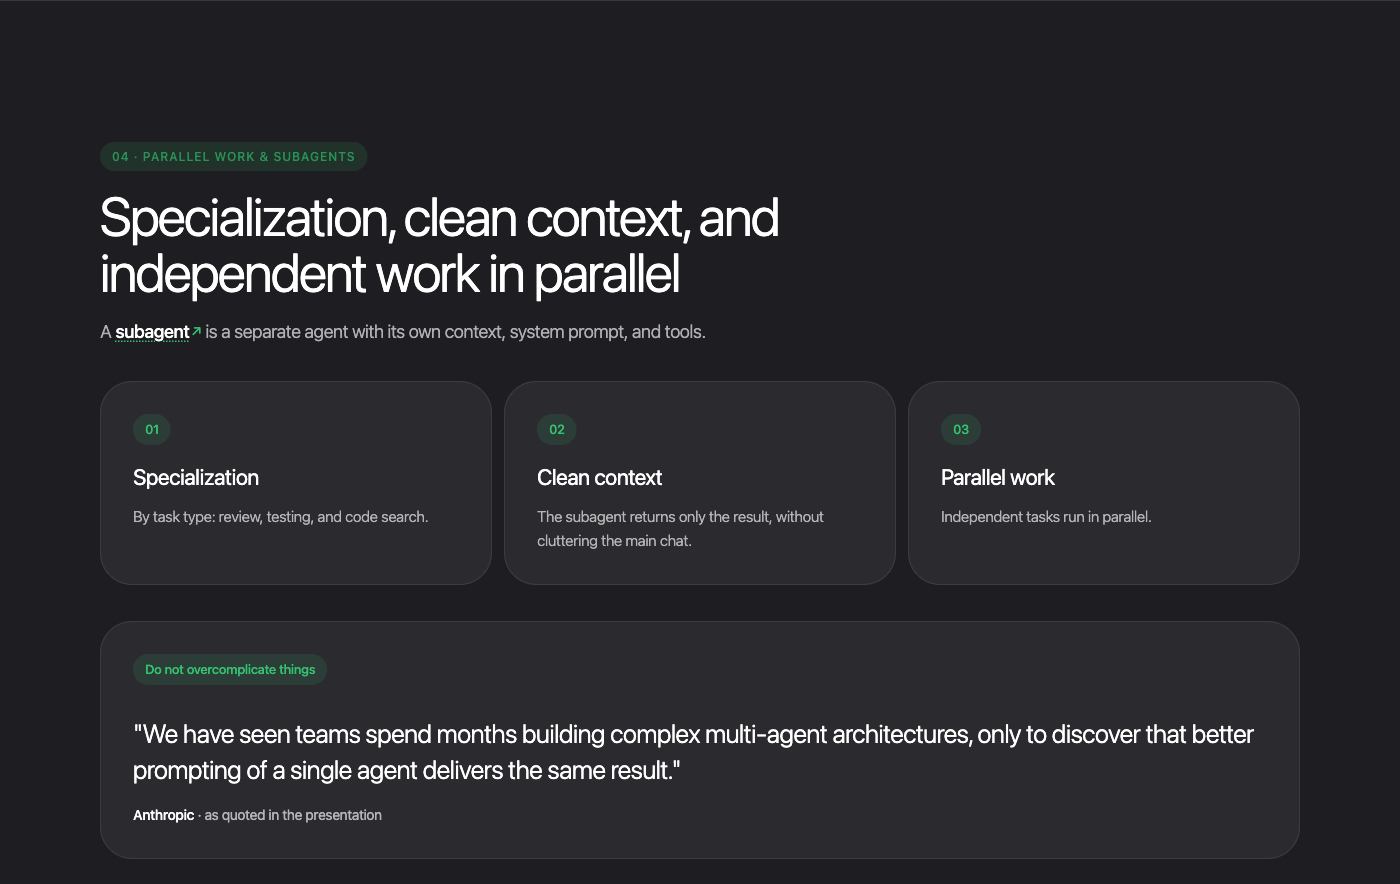
Right after that Sergey showed a slide with a quote from Anthropic: teams spent months building complex multi-agent architectures and then found that better prompting of a single agent gave the same result. His takeaway: for most tasks a well-formed request to a single agent is enough. Subagents come in where a single agent hits the size of the task or the volume of context.
When subagents make sense and when they don't
They make sense for large, independent work that splits cleanly into separate steps.
- Large features: many files and a chain of independent stages (spec, tests, implementation, review), each of which can go to a separate agent.
- Project-wide analysis: gathering documentation, finding functionality across the codebase, going through GitHub issues. These tasks parallelize on their own.
- Review pipelines: several independent checks against different rule sets at once, results collected into one report.
They don't make sense for small tasks and closely supervised work. A single agent is the better default here.
- Small and medium tasks: one agent is faster and cheaper.
- The task fits in one chat: a bug fix, a small feature, improvements to code written in the same chat.
- You need control over every step: the more subagents, the harder they are to supervise.
- Token usage: each subagent gathers context from scratch, so a multi-agent setup is noticeably more expensive.
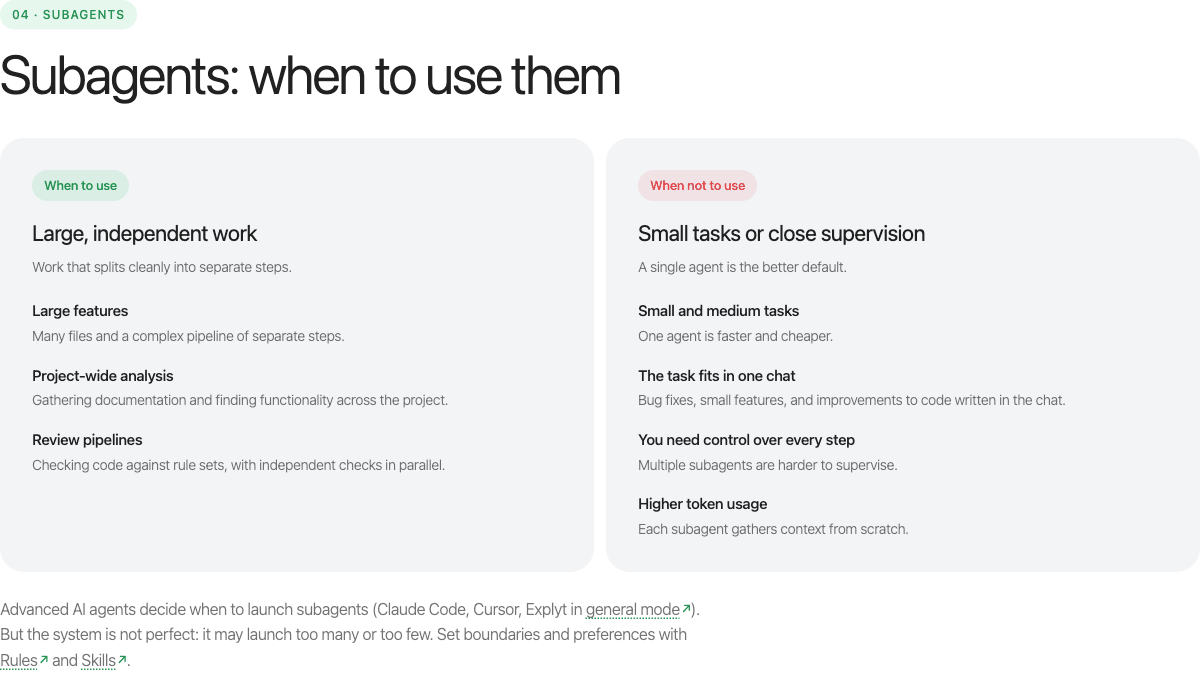
Advanced agents decide on their own when to launch subagents: Claude Code, Cursor, Explyt in general mode. The system is not perfect: it can launch too many subagents on a simple task or none on a complex one. Boundaries and preferences are set with Rules and Skills: for example, a rule "don't launch subagents for tasks under N files" or a skill with a fixed review pipeline.
Parallel work: git worktree
Subagents split one task. For several different tasks at once you need a different tool: git worktree. That is several working copies of one repository in different folders, each on its own branch. Each copy runs its own agent: one builds feature A, the second builds feature B, and you review a bug fix in the third. The agents don't get in each other's way because they work on different file trees, and the commit history is shared.
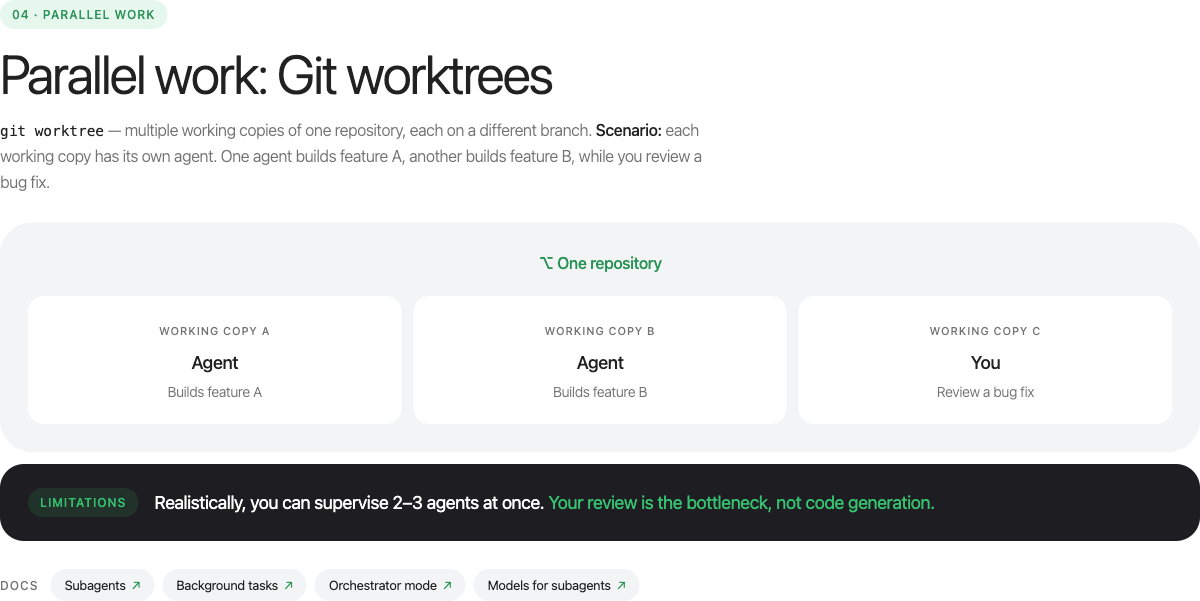
The limitation is stated plainly on the slide: realistically you can supervise two or three agents at once, in the Explyt team's experience sometimes four. Code generation scales without trouble. The bottleneck is your review and the context switching between tasks: every agent eventually brings a diff you have to read and understand, and that is where the parallelism ends.
Personal setup: Rules, Skills, MCP and project memory
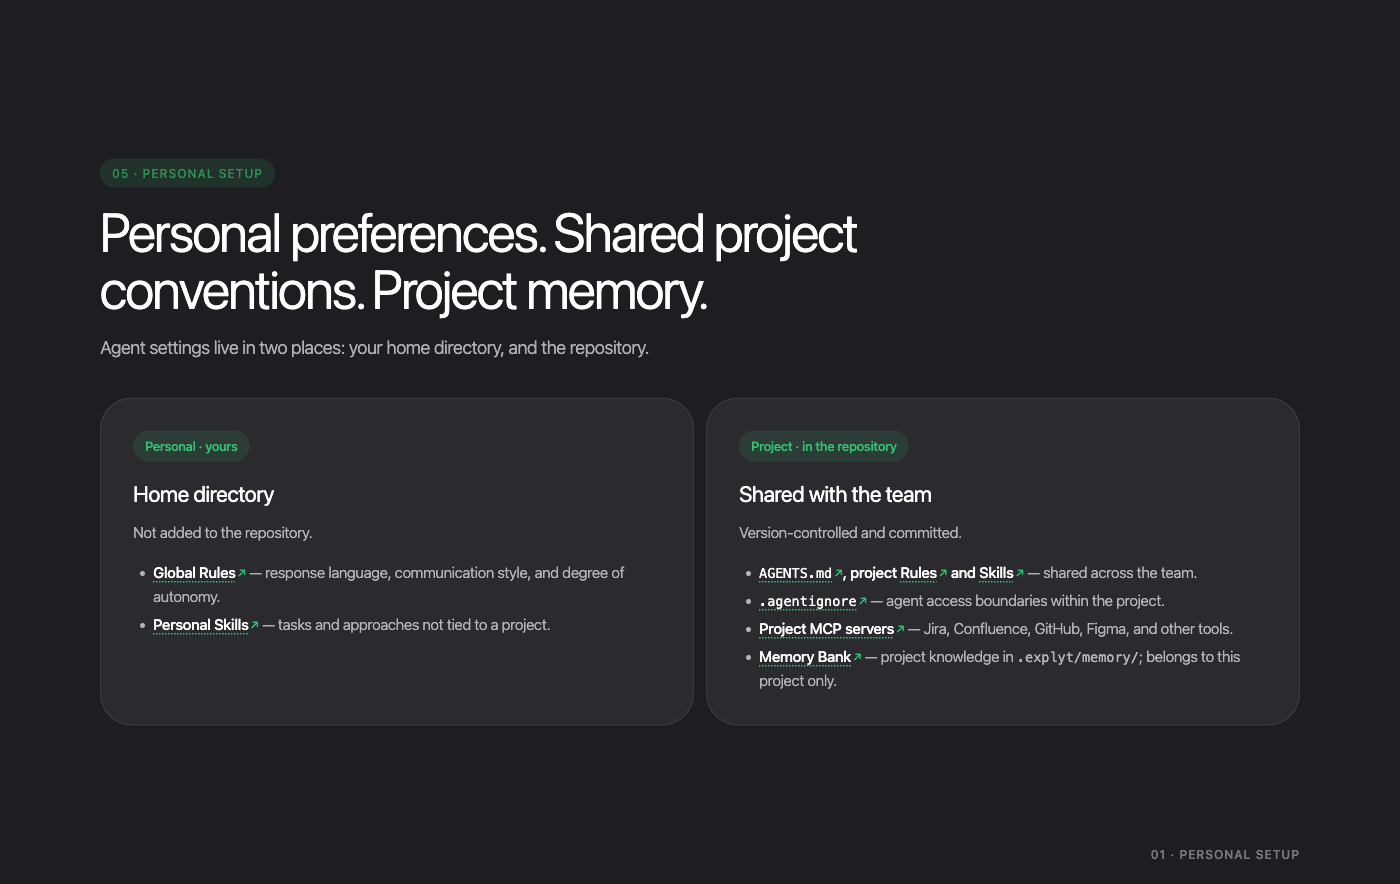
Settings live in two places.
1. Home directory: personal. Never goes into the repository. Global Rules (response language, communication style, degree of autonomy) and personal Skills not tied to a project: for example, your usual format for a stack trace analysis.
2. Repository: shared with the team. Under version control. AGENTS.md, project Rules and Skills, .agentignore with the agent's access boundaries, project MCP servers (Jira, Confluence, GitHub, Figma), Memory Bank in .explyt/memory/.
Three kinds of assets, three jobs
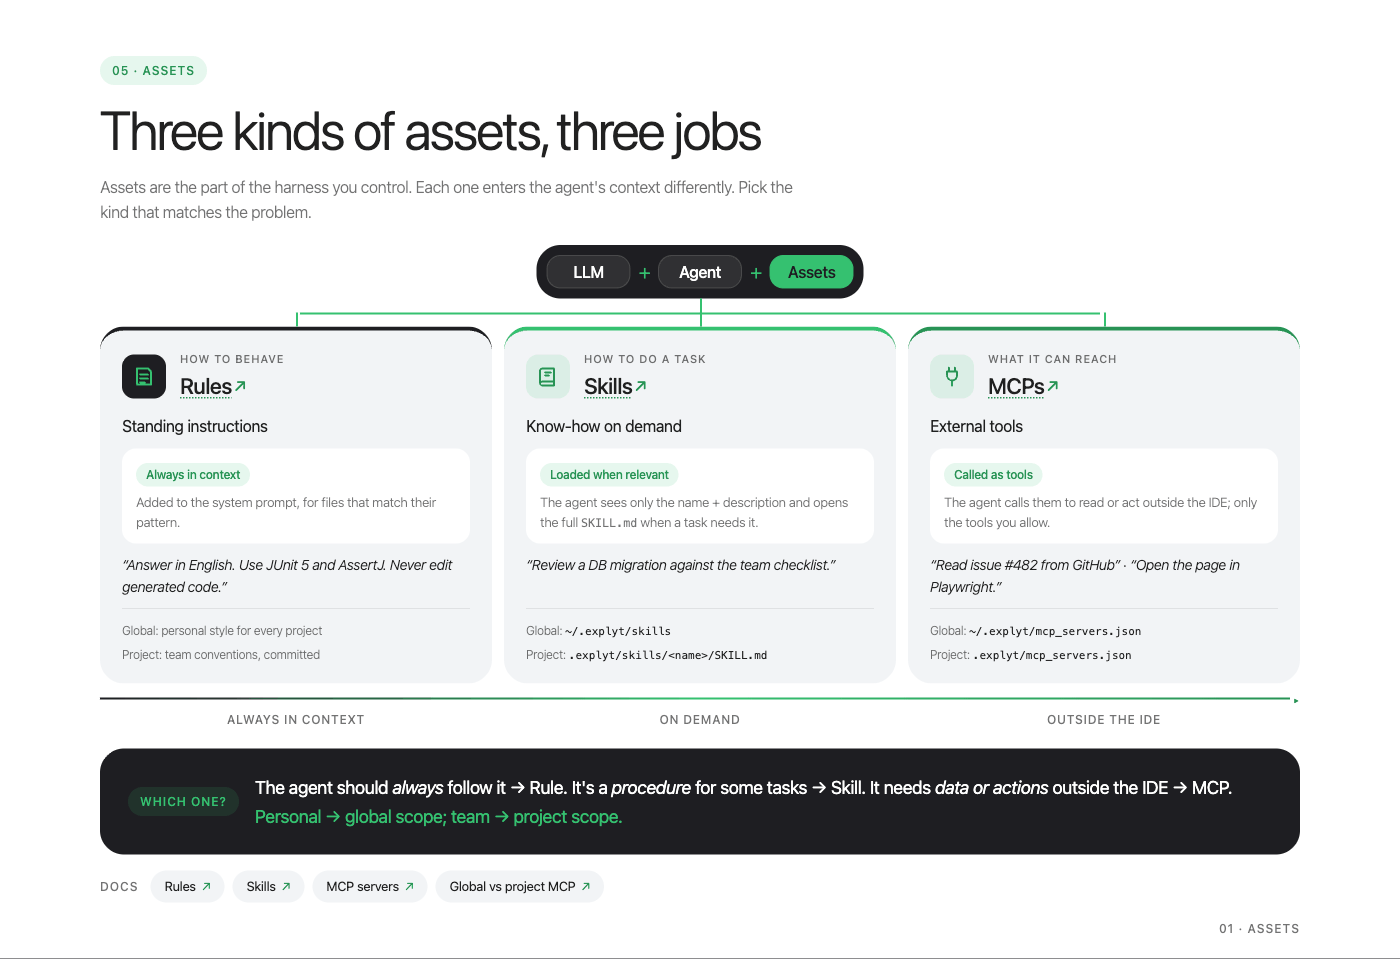
Rules define behavior. Standing instructions added to the system prompt. Example: "Answer in English. Use JUnit 5 and AssertJ. Never edit generated code". In the Explyt documentation a rule is a Markdown file with frontmatter, where filePattern sets the scope: the rule enters the prompt when the open file matches the glob. That way a rule for tests can be limited to **/*Test.kt and stays out of the way when you work on production code. The second field, strictness, sets how often the rule is repeated: once in the system prompt (system, the default), before every request (user-message) or after every tool call (tool-call). The more often, the more tokens it costs. An example from the documentation, a rule for tests in the GIVEN-WHEN-THEN format:
---
filePattern: "**/*Test.kt"
---
Goal: Ensure tests follow the GIVEN–WHEN–THEN (Arrange–Act–Assert) structure.
Instructions:
- Name tests descriptively (e.g., `shouldCalculateTotal_whenCartHasDiscounts`).
- Structure each test into clearly separated sections using comments: `GIVEN`, `WHEN`, `THEN`.
- Keep tests deterministic; avoid time/network randomness and excessive mocking.
- Do not modify production code solely to fit tests without user confirmation.
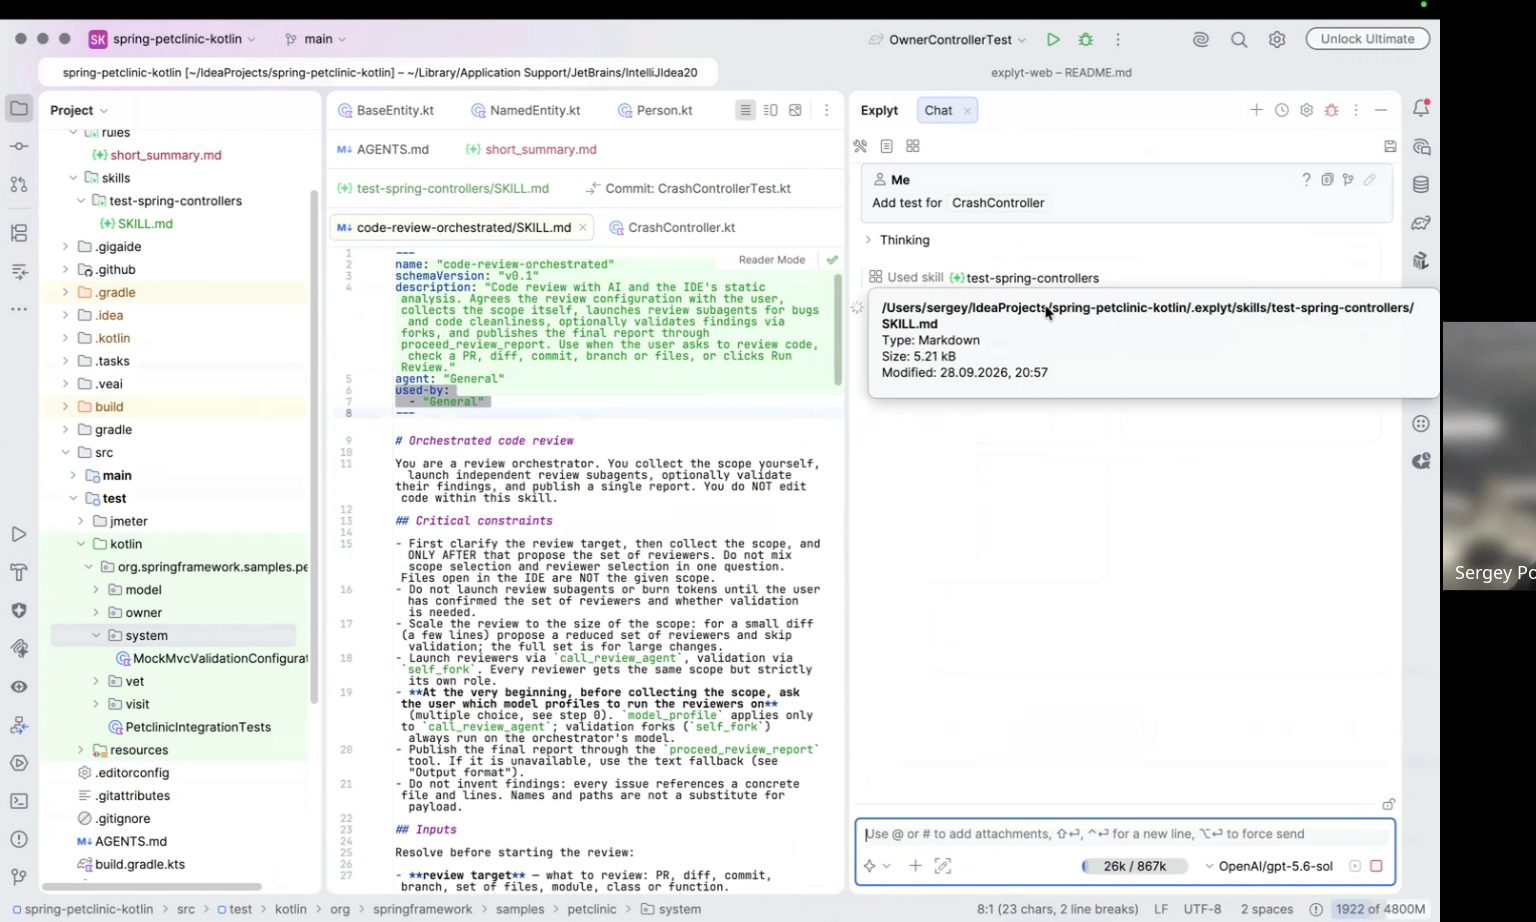
Skills define how to do a task. Know-how on demand: the agent sees only the name and description and opens the full SKILL.md when a task needs it. Globally in ~/.explyt/skills, in the project in .explyt/skills/<name>/SKILL.md. Explyt supports the open SKILLs standard and, per the documentation, also reads skills from other tools' directories, such as .claude/skills/*/SKILL.md, so a team using several agents doesn't need to duplicate them per tool. This is exactly the mechanism Sergey ran into during the demo: automatic skill selection works from the description field and from the used-by field, which lists the agents the skill is available to. Without used-by the agent did not pick the skill up. Below is the Refactor code skill from the documentation: the frontmatter shows description and used-by: Agent, and in the chat the skill is invoked manually with /refactor.
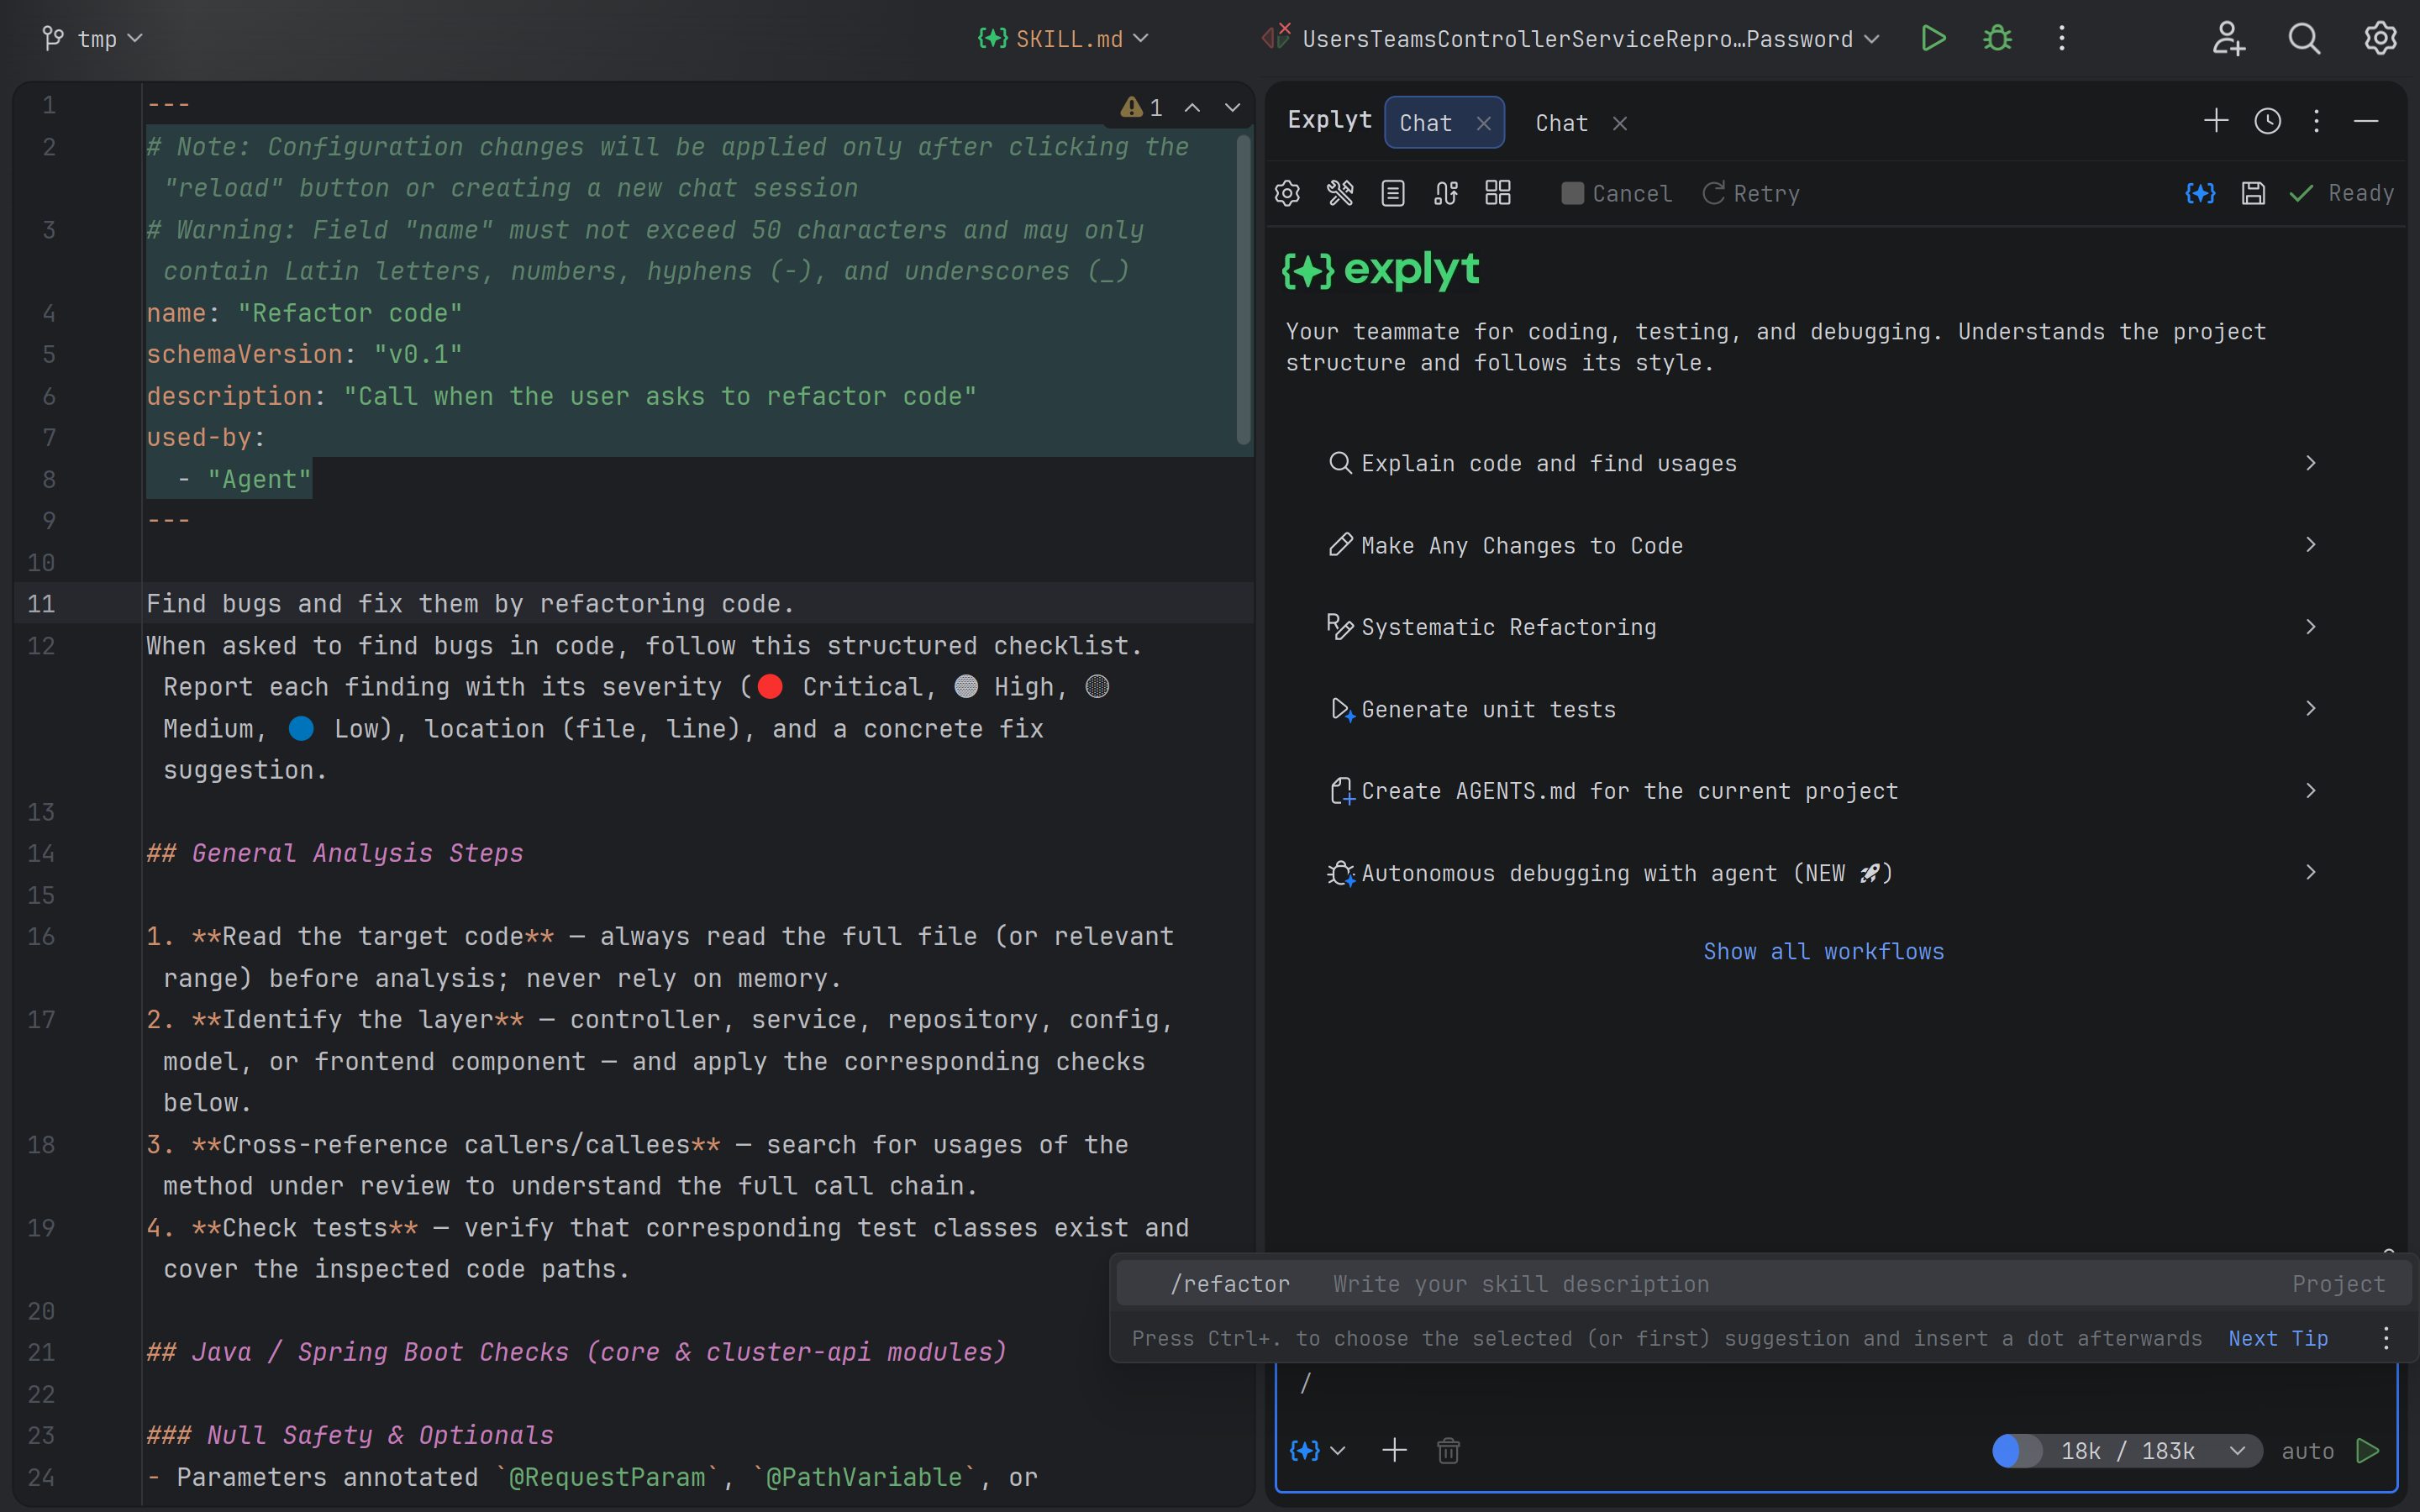
One more number from the documentation: hand-written skills give a noticeable quality boost over generated ones, roughly 15–20% in the team's internal measurements. That lines up with Sergey's advice: generate the skill with the agent, then iterate on it together, editing the description.
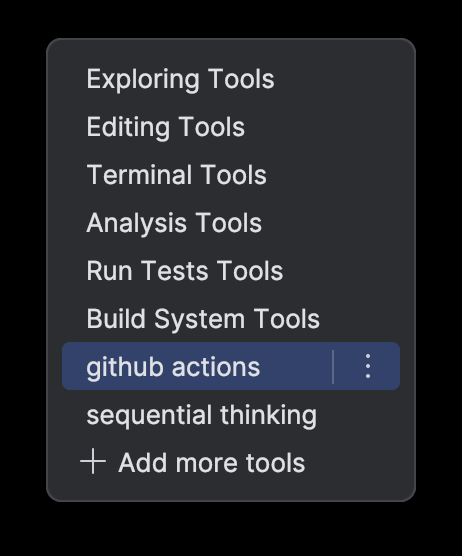
MCP defines what the agent can reach. External tools the agent calls to read or act outside the IDE. Globally ~/.explyt/mcp_servers.json, in the project .explyt/mcp_servers.json. The documentation covers three connection types (STDIO, HTTP, SSE), a GitHub MCP example and a separate section on large servers: if an MCP server has many tools, Explyt can put it behind an MCP subagent so the tool descriptions don't clog the main context. In the chat, connected servers show up next to the built-in tool groups:
The selection rule: the agent should always follow it, so it's a Rule. It's a procedure for some tasks, so it's a Skill. It needs data or actions outside the IDE, so it's an MCP. Personal goes to the global scope, team goes to the project.
Memory Bank: project memory
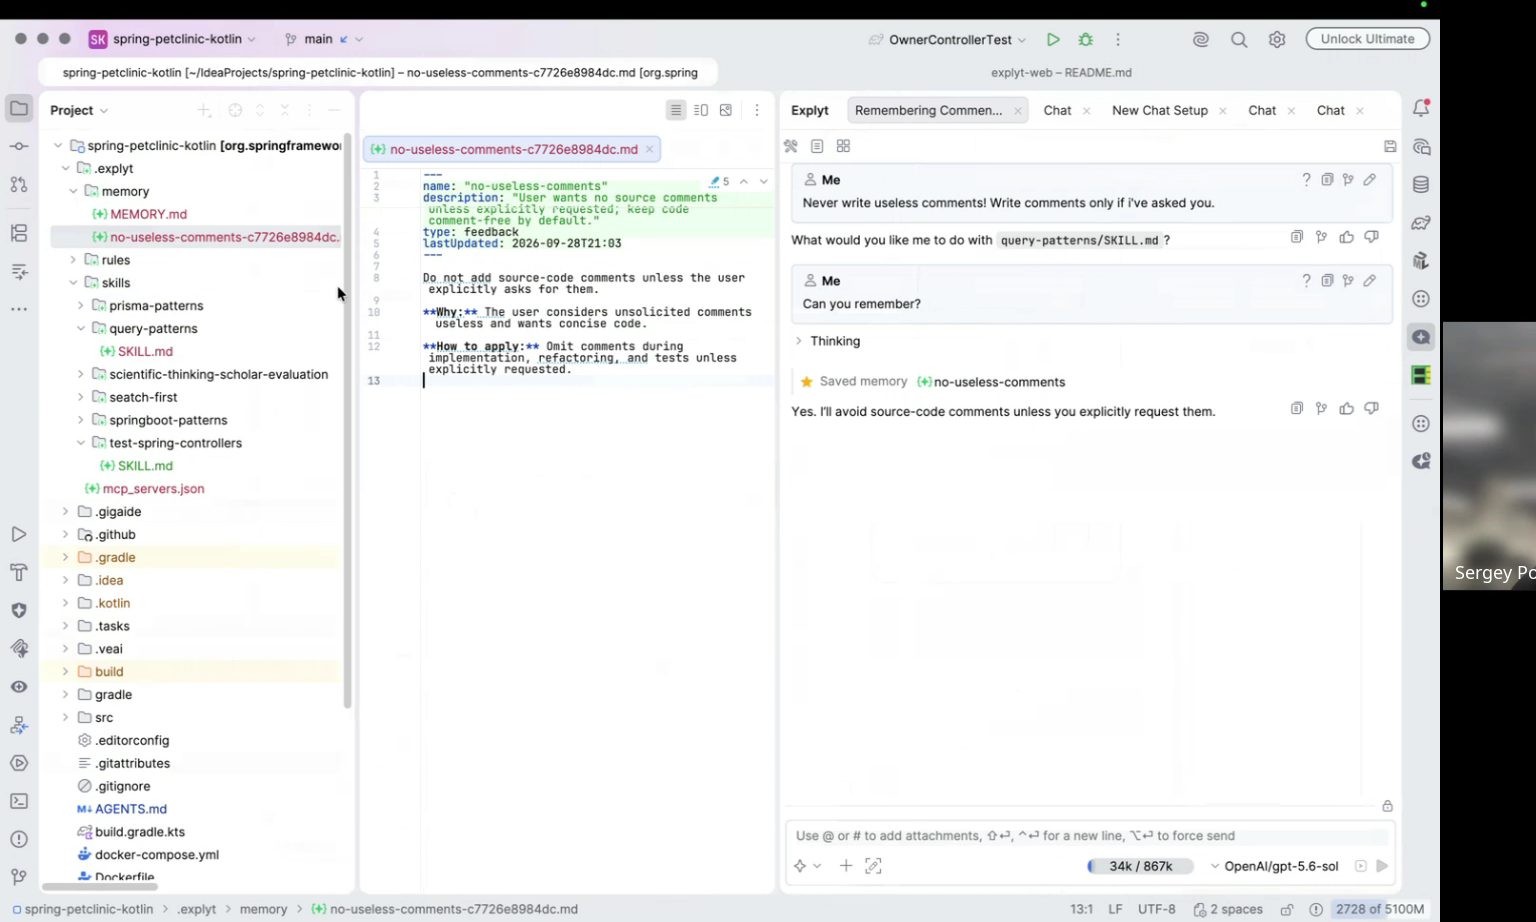
Durable, non-obvious knowledge (conventions, pitfalls, decisions) is stored as Markdown files in .explyt/memory/: an index MEMORY.md plus one file per entry. The agent collects them from your conversations automatically, sees the index, opens the relevant entries, adds new ones and merges outdated ones. The files can be read and edited by hand. There is no personal memory that follows you between projects: keep personal preferences in global Rules. In Explyt, Memory Bank arrived in release 5.14.
The Memory Bank documentation spells out what goes into memory. Four entry types: User (who you are and how you work), Feedback (your corrections and confirmed preferences), Project (non-obvious project knowledge: pitfalls, reasons behind architectural decisions, agreements), Reference (where information lives in external systems). The agent deliberately skips anything easy to reconstruct from code or git: class locations, method signatures, directory structure. Secrets and personal data are not written to memory. The bank holds 200 entries; when it is full, entries unused for more than 30 days go first.
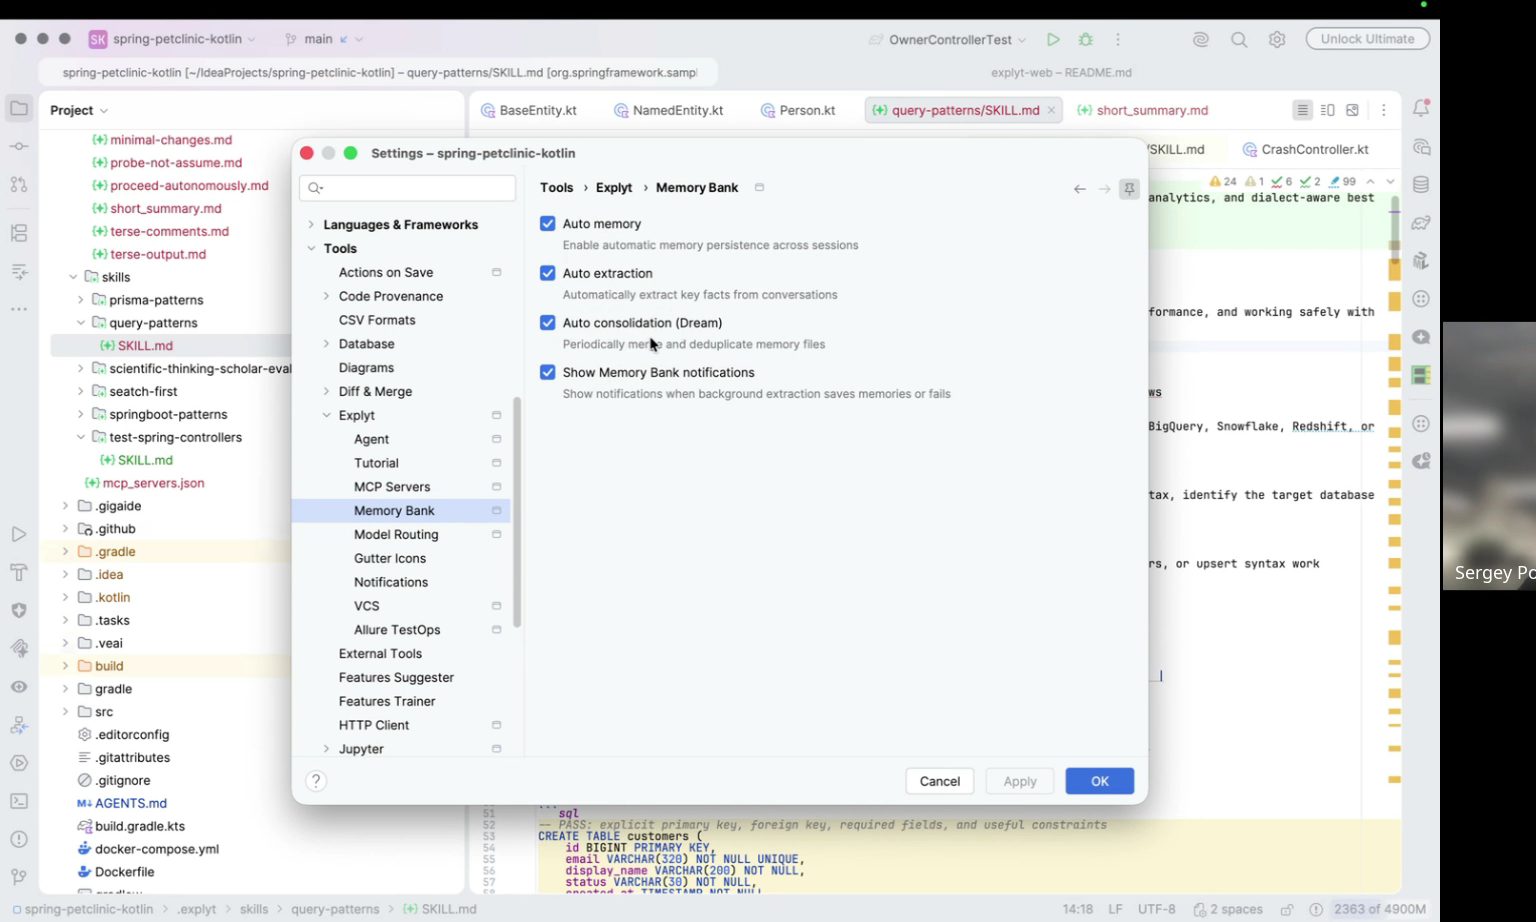
The setup Sergey showed in the demo is described in the documentation as four toggles in Settings → Tools → Explyt → Memory Bank: enable the bank, auto-extraction after each turn, periodic consolidation (the UI calls it dream: it fixes the index, removes duplicates, merges related entries) and notifications about what got saved in the background.
Here is what it looks like in the chat. An explicit "Remember that…" command creates an entry, and the agent confirms the save:
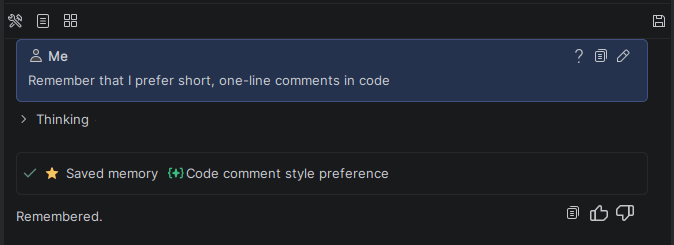
In later chats the agent decides on its own when to look into memory: asked about the project's modules, it first pulls up the klaw-module-structure entry and then answers from it:
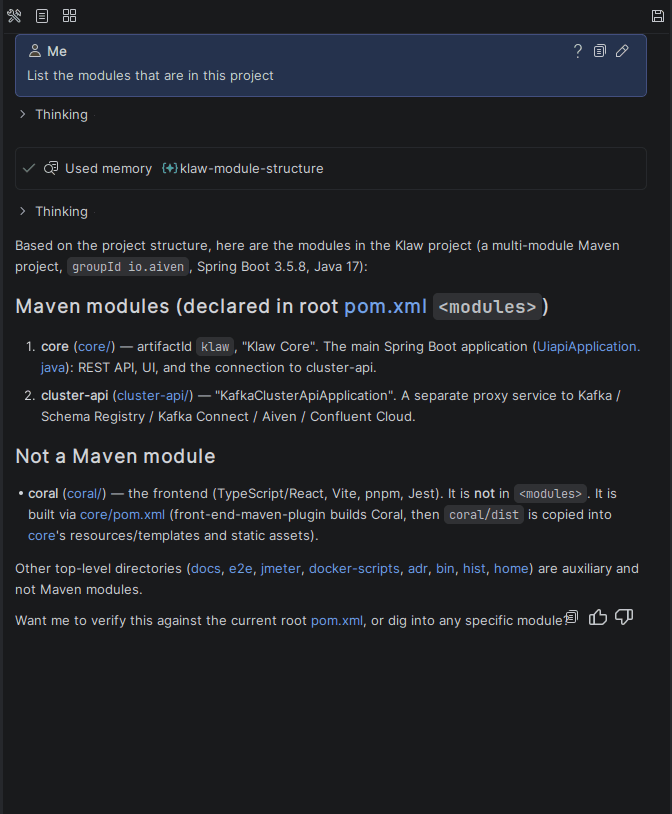
Memory is managed with the same words as in the webinar: "Remember that…", "Update the entry about…", "Forget about…". If you ask to forget one detail from an entry with several facts, the agent removes only that detail.
Live demo in the IDE: what worked and what didn't
The second part of the webinar ran in IntelliJ IDEA on the sample project spring-petclinic-kotlin (Kotlin, Spring Boot, Gradle). The frames below are from the recording.
1. Rule. Sergey created the rule short_summary.md in .explyt/rules/: give a short summary at the end of the job, answer questions briefly. The file opened with a template where the frontmatter already explains filePattern and strictness, and below it Sergey added two items. Then he asked the agent what the project was about, got a compact answer and confirmation that the rule was visible.
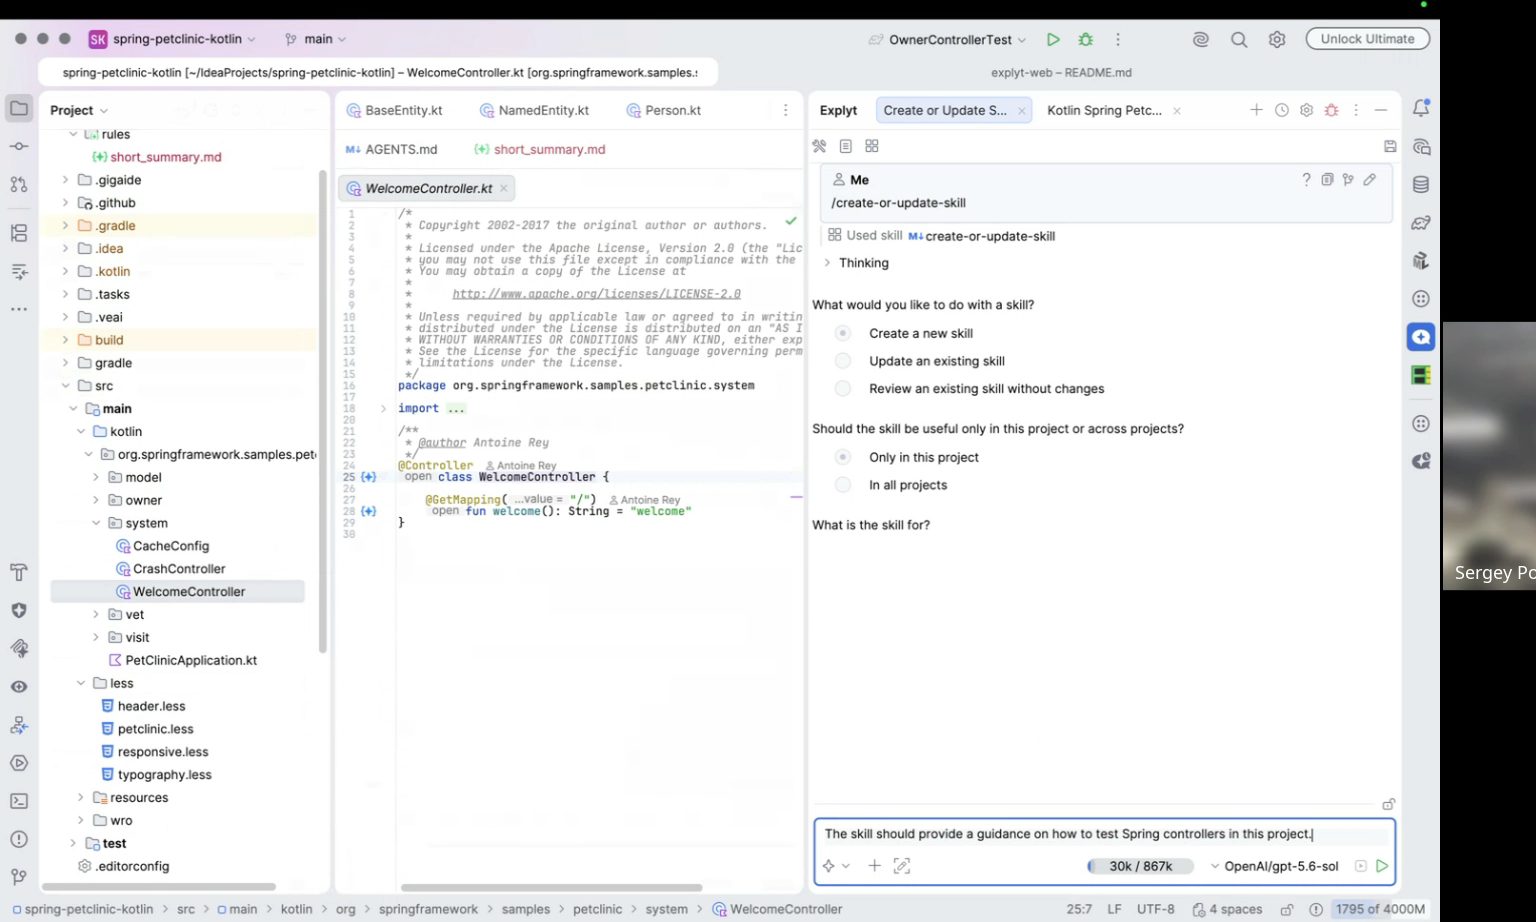
2. Skill. Through the built-in /create-or-update-skill skill he launched the step-by-step wizard: create a new skill or update an existing one, this project only or all projects, what the skill should do. Sergey's answer: "The skill should provide a guidance on how to test Spring controllers in this project".
The agent studied the codebase, found the patterns already in use (OwnerControllerTest, PetControllerTest, MockMvcValidationConfiguration) and assembled test-spring-controllers/SKILL.md with the sections Critical constraints, Project-specific patterns, Output format and Acceptance checklist. The acceptance checklist is the key part: the skill itself requires the agent to verify that the test uses the right slice, that assertions are not weakened and that observable behavior is pinned down. Then the same scheme as in the feedback-loop section: a review agent checked the new skill and found no problems.
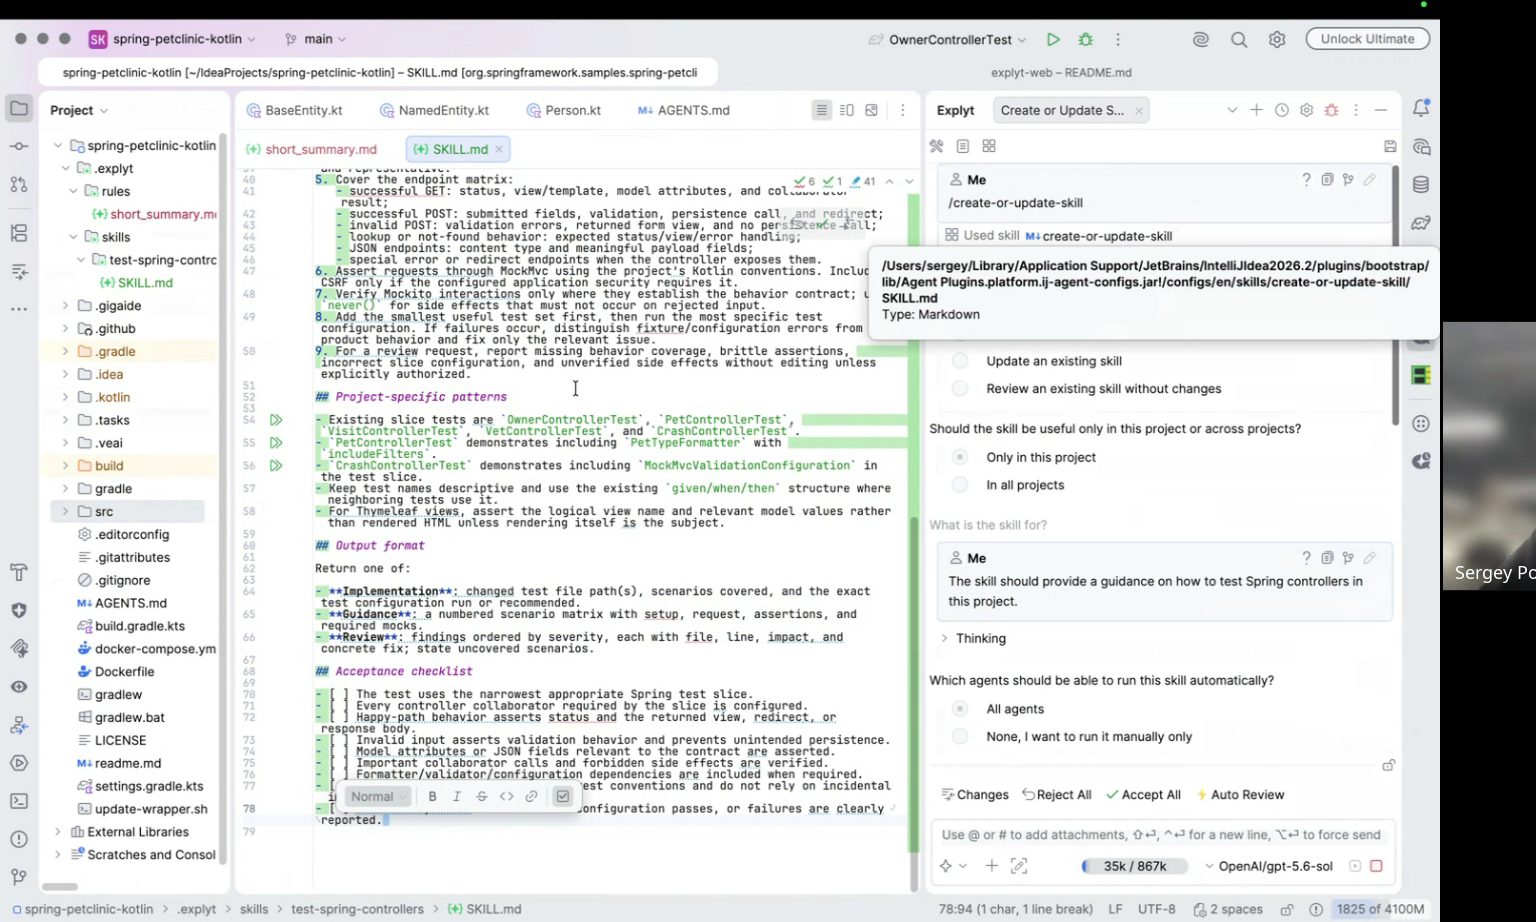
3. The honest moment. Sergey deleted CrashControllerTest.kt and asked "Create tests for CrashController.kt", expecting the agent to pick up the new skill. The agent wrote the test and did not use the skill. The cause was found live: the skill's frontmatter had agent: null, and the section that lets agents pick the skill up automatically (in the documentation's terms, the used-by field) was missing entirely. Sergey added it right in the file, and the Explyt panel showed the session state: 2 rules, 3 skills, 0 MCP servers, memory on.
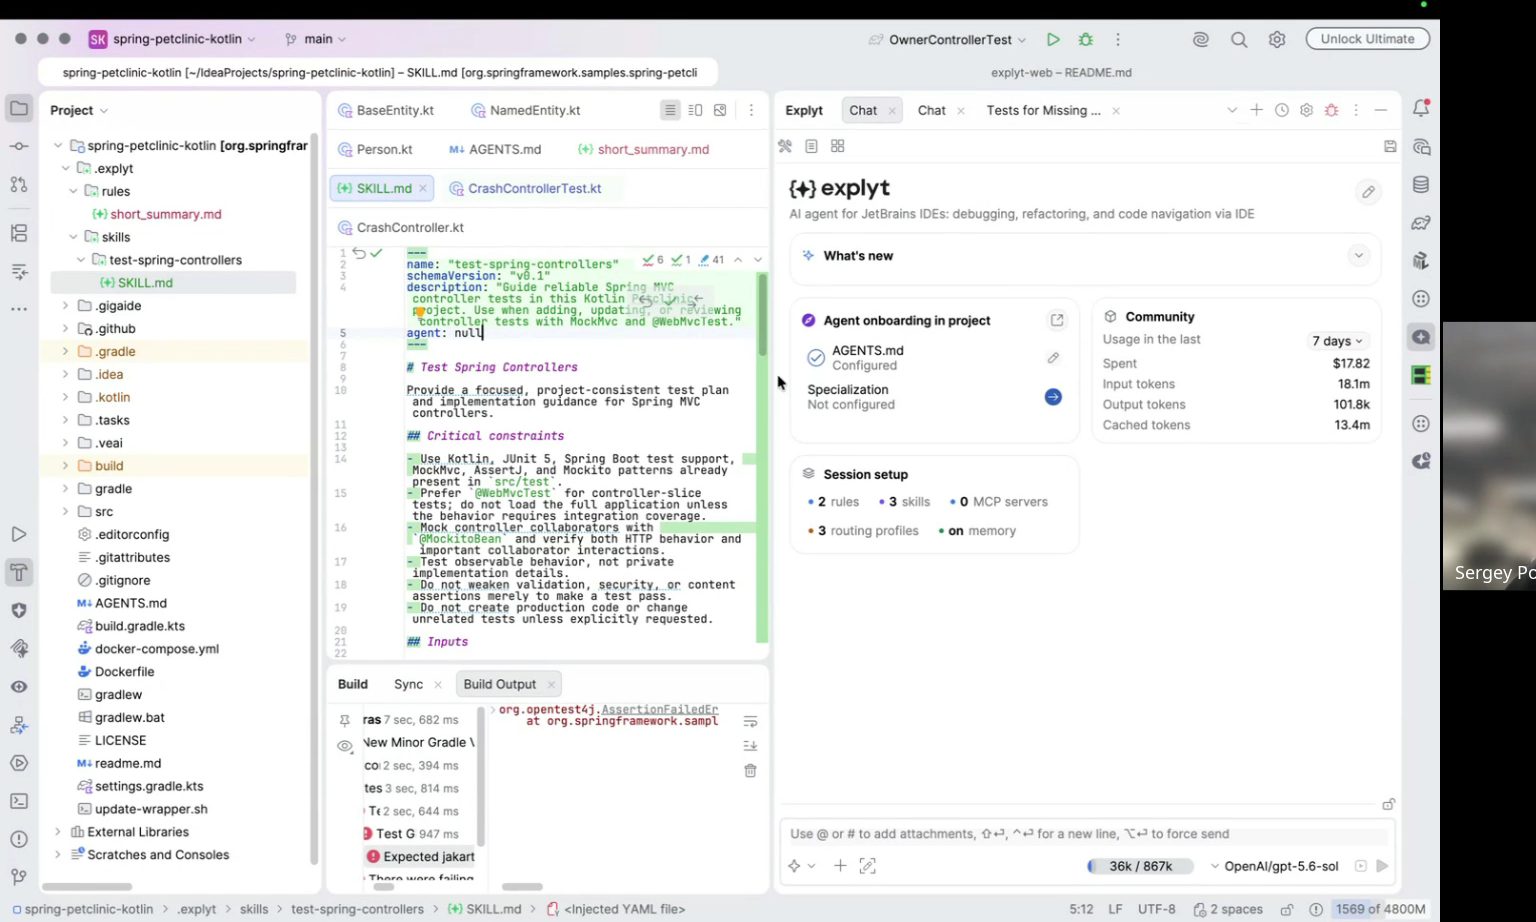
The repeated request "Add test for CrashController" worked: the chat showed the line Used skill test-spring-controllers with a link to .explyt/skills/test-spring-controllers/SKILL.md. Sergey's takeaway: you usually don't write a skill by hand, you ask the agent to write it and then iterate together, editing the description whenever the agent fails to call the skill. Sergey promised to publish the working skill code separately.
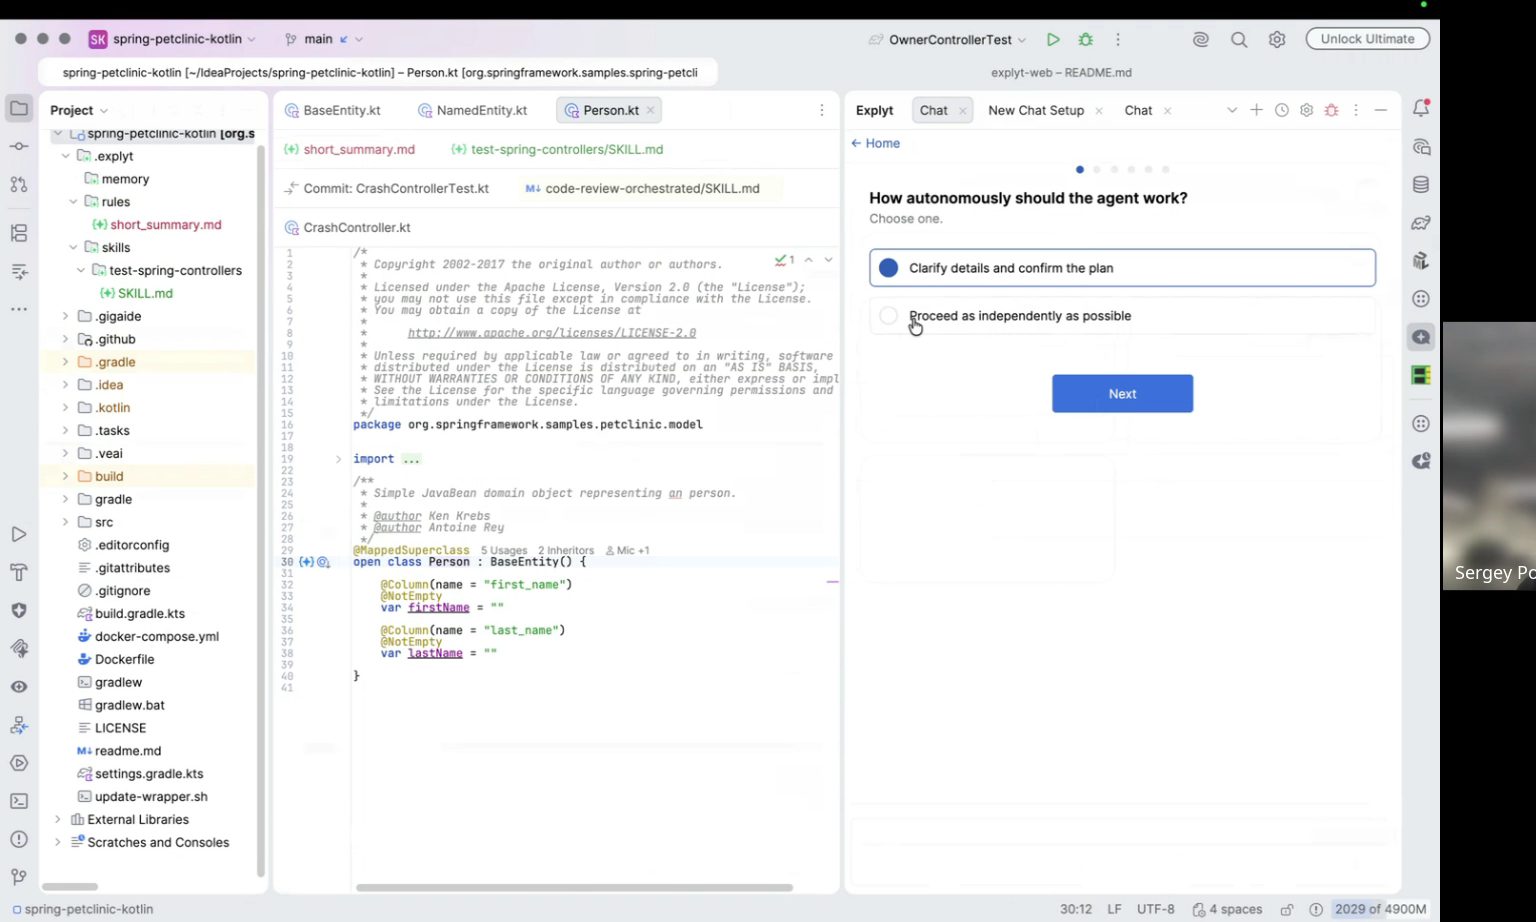
4. Onboarding. Sergey deleted AGENTS.md and opened a new chat. Explyt offered to generate the file through the init skill: it analyzes the project and writes AGENTS.md. Then the New Chat Setup wizard: how the agent should behave (first screen: "Clarify details and confirm the plan" or "Proceed as independently as possible"), whether to run the available checks, whether to answer briefly, role, frequent tasks. The output is a list of Rules, Skills and MCPs for the project, and you can switch off the ones you don't need before confirming.
5. Memory. In Settings → Tools → Explyt → Memory Bank Sergey checked the four toggles: Auto memory, Auto extraction, Auto consolidation (Dream), Show Memory Bank notifications.
He told the agent: "Never write useless comments! Write comments only if I've asked you", then "Can you remember?". The agent replied Saved memory no-useless-comments, and the file .explyt/memory/no-useless-comments-….md appeared in the project tree with frontmatter (type: feedback, a description) and a body in the "Why / How to apply" format. The file opens and edits like any Markdown, and the next code generation comes without unnecessary comments.
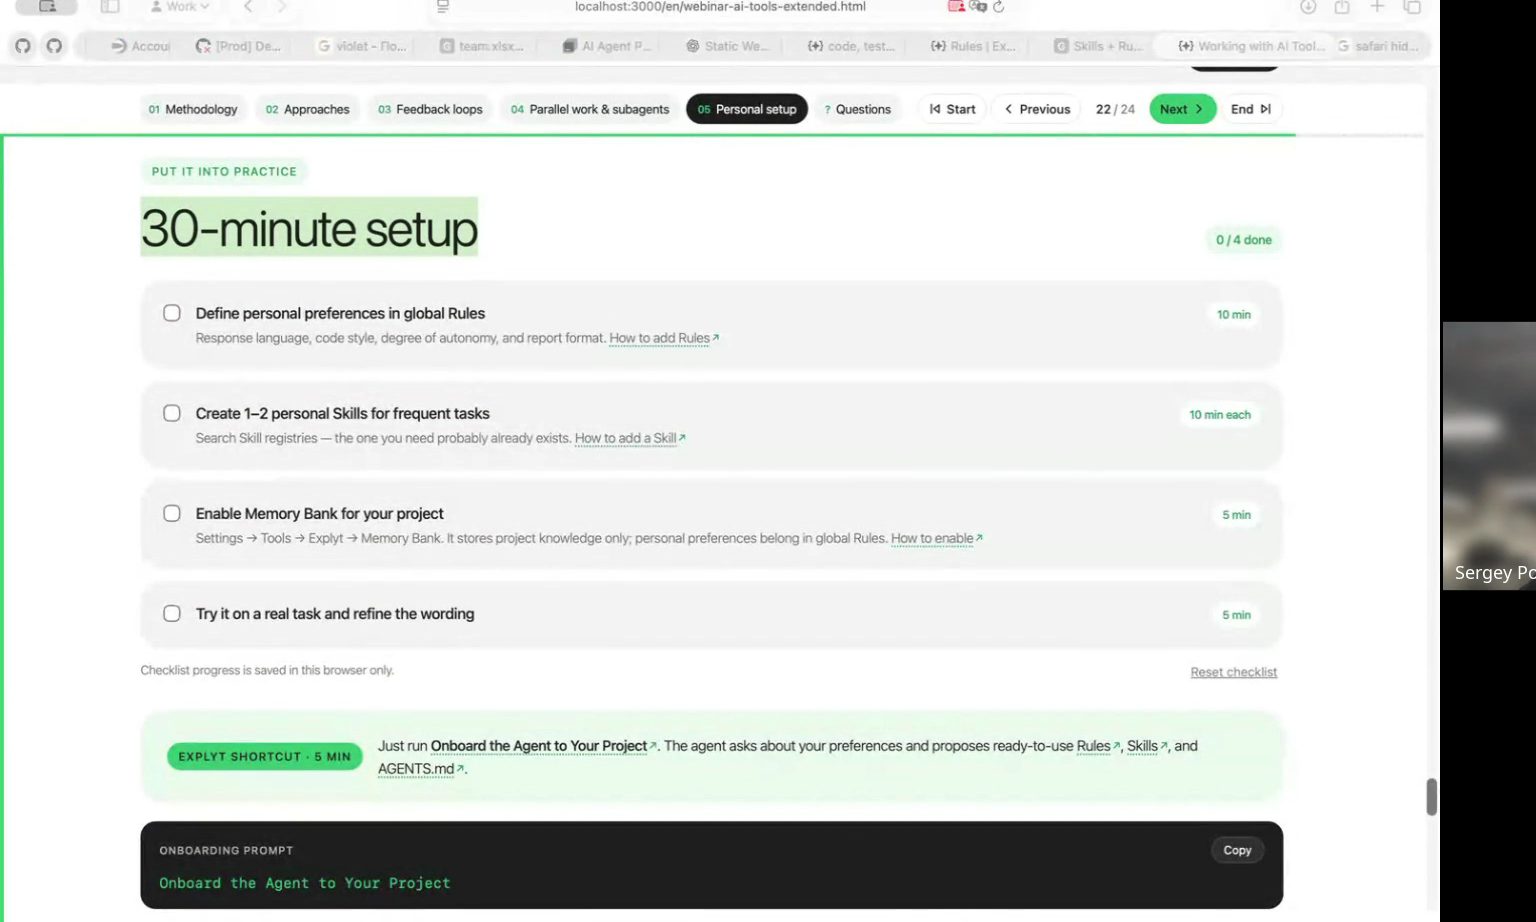
30-minute setup
The checklist from the guide:
- Global Rules: response language, code style, degree of autonomy, report format. 10 minutes.
- One or two personal Skills for frequent tasks. Search the skill registries first: the one you need probably already exists. 10 minutes each.
- Memory Bank for the project: Settings → Tools → Explyt → Memory Bank. 5 minutes.
- Try it on a real task and refine the wording. 5 minutes.
The shortcut in Explyt: run the Onboard the Agent to Your Project skill. The agent asks about your preferences and proposes ready-to-use Rules, Skills and AGENTS.md.
Get started with Explyt
Reproduce, inspect and fix inside JetBrains IDEs, with the debugger, run configurations and IDE facts as evidence.
Sources
- Extended webinar guide: Working with AI Tools at the User Level: Extended Guide
- Webinar recording, 28 September 2026: coming to https://www.youtube.com/@Explyt-ai
- Explyt documentation: Plan mode, Rules, Skills, MCP servers, Memory Bank, Edit Scope, Automatic code review, Subagents, Agent onboarding